The big twin headlights, perhaps the defining feature of the Honda XR250 BAJA (the Japan-market XR250 / MD30 with twin headlights). They are reassuring when riding at night, but are you troubled by "the beams are out of line and I can't see the road at night" or "oncoming drivers flash their lights at me"?
Unlike most bikes, the twin-headlight XR BAJA needs each of its two lights adjusted, so people tend to avoid doing it themselves ("looks difficult..."). But in fact, once you know the knack, you can do it yourself with just a Phillips screwdriver.
In this post I explain how to aim the headlights on the XR BAJA clearly, so you can follow it on your phone in the garage.
This post will help you:
- See better when riding at night, and ride more safely
- Learn how to aim both lights of a twin-headlight bike
If you feel your lights aren't pointing the right way, or the two lights shine in different places, read on.
Why headlight aim matters on the XR BAJA
Safety at night, and not dazzling oncoming traffic
The "BAJA" in XR BAJA is said to come from the Baja 1000, a desert race held on Mexico's Baja California peninsula. A defining feature of the XR BAJA is its twin headlights. But if the aim is off, no matter how bright the bulbs you fit, they won't light the road ahead properly.
Also, if the beams point too high, they badly dazzle oncoming traffic, which could lead to trouble or even accidents. To keep yourself and others safe, check them from time to time.
What to prepare before aiming the headlights
All you need is a Phillips screwdriver
Aiming the XR BAJA's headlights is simple. Basically, a short No. 2 Phillips screwdriver is all you need. Just turn the separate up/down and left/right adjusting screws to change where the light points. The two lights can each be adjusted separately.
Preparing a wall and a tape measure for accurate measurement
If you adjust by feel alone, you often find it is completely wrong when you actually ride.
- Level ground
- A vertical wall
- A tape measure for distances
- Masking tape for marks
Get these ready, and set up a place where you can measure 5 to 10 m from the wall.
Take a photo of where the lights point before you start
Before you start, I strongly recommend that you take a photo on your phone of where the lights currently shine on the wall. It is the surest backup against losing track of the original position after adjusting again and again.
The effect of tyre pressure and suspension sag
Headlight aim depends a lot on the bike's attitude.
- Low tyre pressure
- Worn-out rear suspension
- A heavy load: any of these tends to make the beams point upwards. As far as possible, adjust the lights in the same conditions as when you ride (tyre pressure, load).
How to aim the XR BAJA's headlights
Find the adjusting screws (up/down and left/right)
Find the screws inside the headlight guard on the XR BAJA.
- Up/down: the screw below the headlight unit
- Left/right: the screw on the side of the headlight unit. Turn it a little at a time and watch which way the beam moves on the wall when you turn it clockwise.
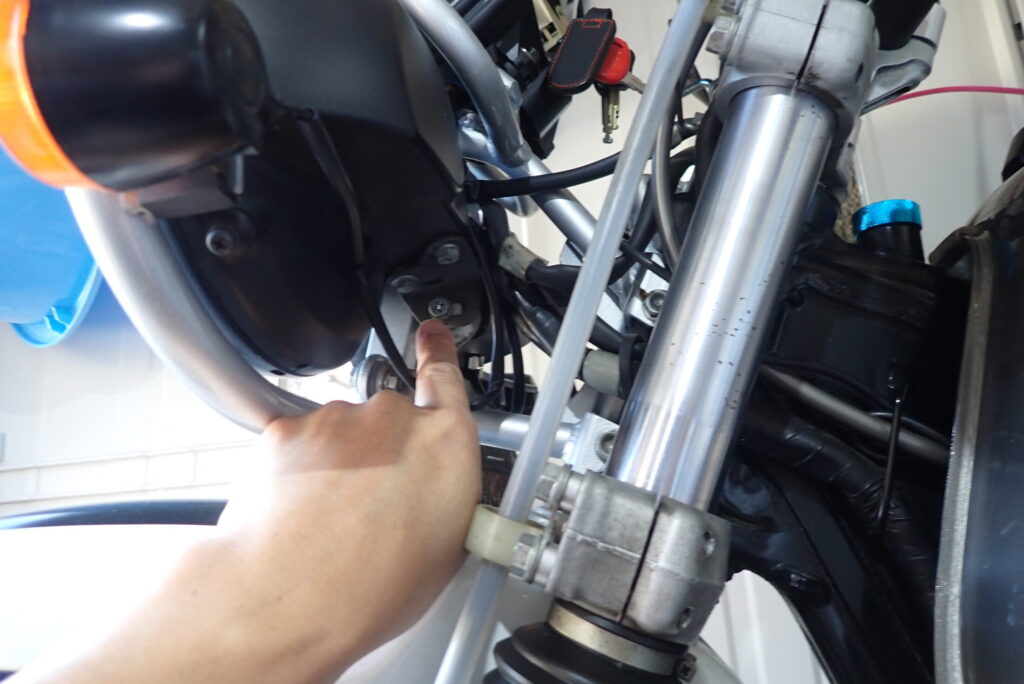
This is the BAJA's headlight seen from the side. The headlight adjusting screw is where my finger is pointing.
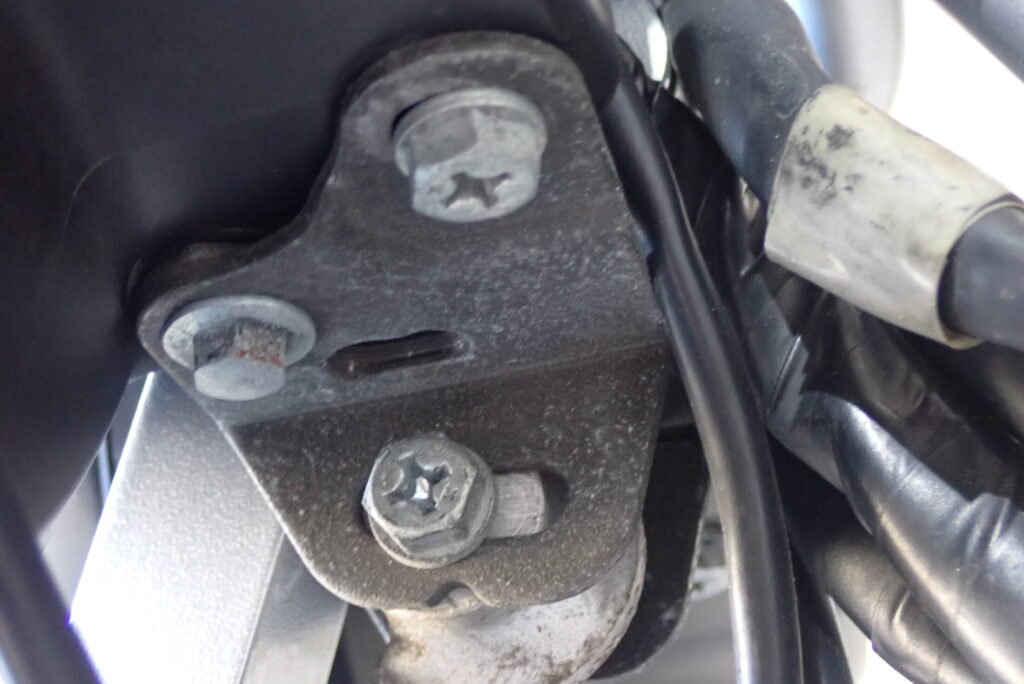
This is a close-up of the adjusting screw. The bolt with the Phillips slot is the one for adjusting the aim. Instead of a screwdriver, I think you can also turn it with a 10 mm spanner (if I remember right).
Tip for twin headlights: cover one light at a time
The knack for adjusting the BAJA is to cover one of the lights.
If both lights are on, their cut-off lines (the edge of the beam) overlap, and you can't tell which light you are adjusting.
Cover one light completely with cardboard or a thick cloth, and set each light one at a time.
I parked a car in front of the bike and adjusted the lights while actually shining them at it. I set the aim so that the beams would not dazzle someone sitting in the car in front. Even without a wall, this got the aim about right.
Specific figures for a simple wall check (distance and height)
As a general guide, there is also this simple method (I didn't measure it this way myself):
- Stand the bike upright 5 m from the wall (ideally with a rider on it).
- Measure the height from the ground to the centre of the headlight.
- Adjust so that the brightest part of the beam on the wall (the elbow point of the cut-off) is about 5 to 10 cm lower than the height of the headlight centre. *For left/right, make sure the beam points straight ahead in the direction the bike faces.
Other headlight maintenance worth doing at the same time
Fit new bulbs for more light
Bulbs are consumables. Even if they haven't blown, they can get dimmer after long use. When you aim the lights, it may be worth fitting new bulbs too.
Benefits and cautions of high-efficiency or LED bulbs
LED bulbs have improved a lot recently. Their benefits are a whiter, brighter light and lower power consumption. But cheap LEDs can have a poor beam pattern, so the beam can't be aimed properly (and may fail roadworthiness inspections). Choose one from a reputable maker.
*I don't know whether the bulbs I mention (M&H Matsushima PH8 halogen and PonLED LED bulbs) fit the XR BAJA; they are just examples of what is available in Japan.
Clean cloudy lenses for looks and performance
After years of mud and small scratches, the XR BAJA's lenses can lose their clarity. Polishing them with a lens cleaner removes the cloudiness and makes them look better too.
I think it also works well to wrap a cloth around the end of a chopstick and clean the inside of the lens with cleaner.
Summary: keep your XR BAJA's view clear and ride safely
Once you know the knack, you can aim the XR BAJA's headlights yourself. In particular, covering one light at a time is the key to accurate setting on a twin-headlight bike.
Well-aimed lights make night riding less stressful. Start by checking where your lights point!
If your BAJA's headlights feel dim, I also wrote about ways to make them brighter, including my multi-reflector H4 conversion.