Why do the XR BAJA's headlights feel dim?
The stock bulbs (PH8, 35/36.5 W) and their limits
The twin headlights are the symbol of the Honda XR250 BAJA (the Japan-market twin-headlight XR250, MD30), but each bulb is only a 35 W PH8, so they are not what you would call bright.
- Type: PH8 (12 V, 35/36.5 W)
- In practice: each light is dimmer than a modern H4 bulb (55 W).
- Weak point: on mountain roads at night or in the rain, the beam covers a wide area but tends to lack the power to light up the road surface.
Cloudy lenses and voltage loss in the wiring with age
It isn't only the bulbs that hold back the brightness.
- Yellowed lenses: the stock lenses are plastic, and after many years they can be cloudy and block the light.
- Voltage drop: old wiring and contacts can have higher resistance, lowering the voltage that reaches the bulb.
"Not working to their full potential": I think many BAJAs are like this.
For reference, this is a BAJA with the stock headlights.

Safer night riding! Five ways to make the headlights brighter
1. [Easy] Fit high-efficiency bulbs (M&H Matsushima and others)
The easiest method, with little that can go wrong.
- What: just swap in brighter bulbs of the same PH8 type as stock.
- Pros: done with one tool. No wiring changes.
- Suits: beginners who just want things a bit better than now.
2. [Caution] LED bulbs: lower power use and the effect on the regulator
Converting to LED is popular, but older bikes have a particular risk.
- Risk: if power consumption drops too much, the surplus power turns into heat and can kill the regulator (rectifier).
- What to do: if you fit LEDs, choose carefully, understanding the load on the electrical system.
3. [Better voltage] Fit a headlight relay to restore the original brightness
This is like a bypass operation: power is taken straight from the battery.
- Effect: it reduces the voltage drop caused by old wiring, so the bulbs get their proper voltage.
- Point: a home-made harness keeps the cost down. I couldn't find a BAJA-specific kit, so you need some wiring know-how.
4. [More visibility] Consider adding fog lights (auxiliary lights)
The brute-force way: physically add more light.
- Pros: clearly brighter.
- Cons: they break easily in a fall, and finding a place to mount them on an off-road bike is a headache.
5. [Big change] Fit multi-reflector units for a more efficient beam
Instead of a patterned lens, this uses a reflector to spread the light.
- Biggest advantage: you can change the bulbs to H4.
- Effect: the lights look less old-fashioned, and night riding becomes much easier.
My recommendation: multi-reflector units with H4 bulbs!
Can you use 160 mm universal units? Choosing the parts
To fit inside the BAJA's twin headlight guard, look for universal units with a 160 mm diameter.
- Material: choose units with glass lenses and you have less to worry about yellowing.
- Caution: they are universal parts, so fitting them needs some trial fitting, adjustment and DIY ingenuity.
From PH8 to H4: a home-made adapter harness for peace of mind on tour
A hidden benefit of this conversion is how easy the bulbs are to get.
- PH8 (stock): often not stocked at DIY stores in rural Japan.
- H4 (after conversion): sold in many shops, such as DIY stores and car accessory shops.
With one home-made adapter harness, you can deal with trouble on tour without worry.
Fitting tips, waterproofing and wiring
The hard part of the job is how cramped the headlight shell is.
- Wiring: the H4 connectors and adapter harness fill the shell, so routing the wires is like a puzzle.
- Waterproofing: universal units often have poor sealing at the back, so remember to seal them with caulk or similar.
The actual job: fitting multi-reflector units for a more efficient beam
Of the five methods above, to give you the result first, I converted my lights to multi-reflector units.

This is how it looks after the multi-reflector conversion.
Replacing the BAJA's headlights with multi-reflector units
First, what you need for this job:
- A harness to adapt the stock connector to an H4 connector (home-made)
- Multi-reflector headlight units
- Crimping pliers
- Masking tape
- Sealant
- A saw for plastic
- High-efficiency bulbs with an H4 base (not needed if you use the ones supplied with the units; I changed the bulbs too because I wanted the lights as bright as possible)
(I think 60 W bulbs could overload the charging system.)
First, you need the multi-reflector headlight units.
I'm not certain, but I think units with a lens diameter of 160 mm will fit.
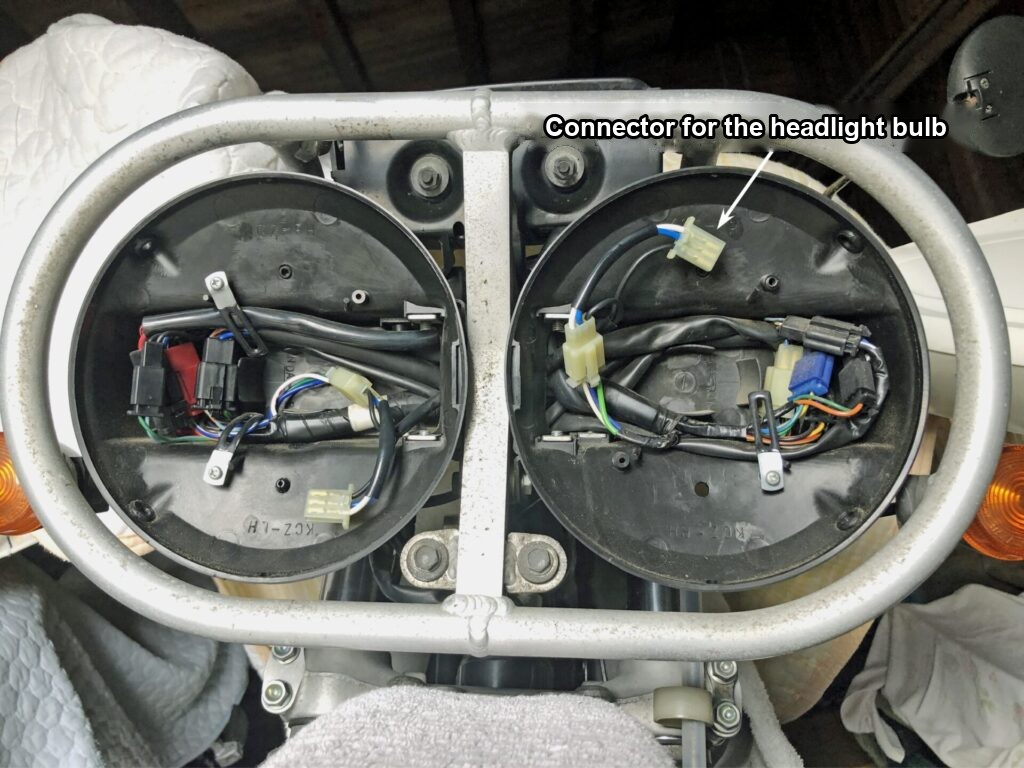
Remove the bolts and so on, and take off the lens units.
By the way, you may have noticed that the headlight guard looks much cleaner in this photo than in the previous one.
That is because when I converted to multi-reflector units, I also took the guard off and had it powder coated.
I wrote about the cost of powder coating the headlight guard in a separate post (in Japanese).

In the photo above I have removed the headlight shells too, but you don't need to remove them just to fit multi-reflector units.
I removed them this time because I wanted to clean them thoroughly.

The photo above shows a stock headlight unit after removal.
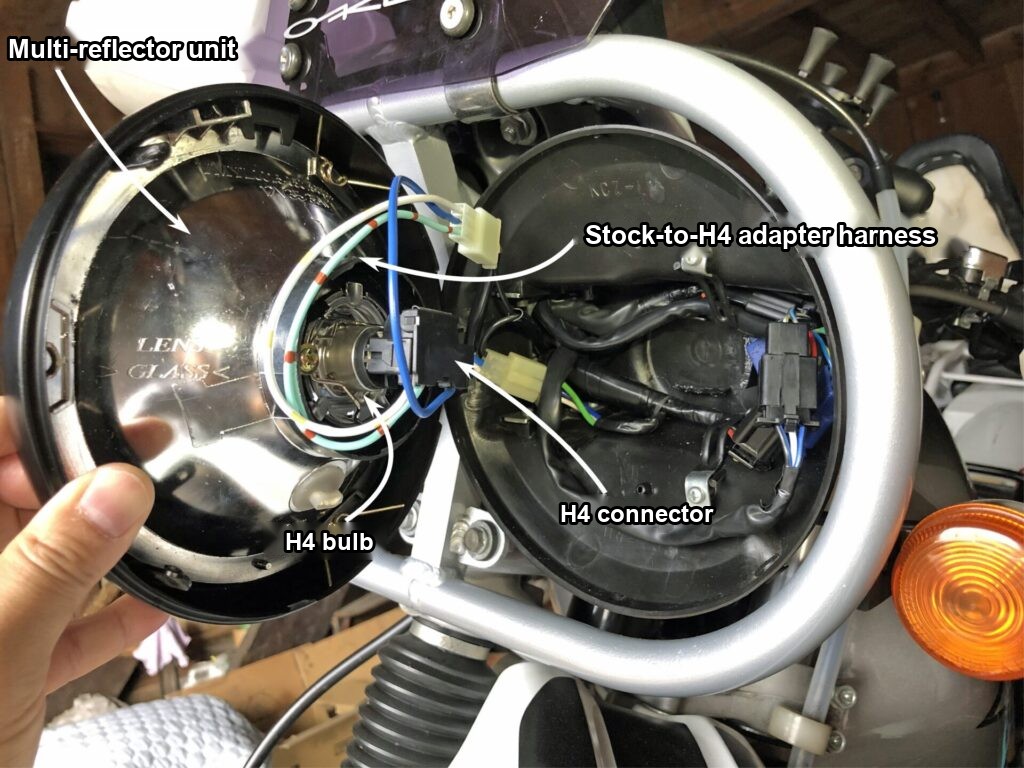
In this photo the multi-reflector unit is already fitted.
For the bulbs, I used M&H Matsushima 16AH B2C bulbs (HS1, 12 V 35/35 W, with the same base as H4) so that higher power consumption wouldn't flatten the battery.
Depending on the multi-reflector units you use, some modification may be needed.
As you can see in the photo above, the H4 terminals are left exposed.
I'm a little worried about rain getting in, but I rarely ride in the rain, so I have left it as it is.
If you ride in the rain, I think you need some kind of protection.
Also, the H4 connector and harness are bulky, so routing the harness inside the headlight shell is a struggle.
I didn't want to modify the stock harness, so I made a PH8-to-H4 adapter harness and plugged it in between.
The extra wiring from that adapter is a big part of why routing is so awkward.
If you replace the PH8 connector on the stock harness with an H4 connector, I think routing the harness inside the headlight shell would be easier.

Now, this is the front of the unit.
The units I bought had a position lamp below the main bulb.
But I couldn't work out how to wire the position lamp, so I filled it with white caulk and didn't use it.

Fit the headlight into the headlight shell, and it's done!

Summary: choose what suits your bike's condition
Improving the headlights is proactive maintenance for keeping your bike on the road for a long time.
- For ease: high-efficiency bulbs
- For a real fix: multi-reflector units
How many more years and how many more kilometres will you enjoy your BAJA? Choose the method that suits your riding, and light up your night journeys!
The content on this site is a record of my own work, based on personal experience and opinion. I cannot guarantee its accuracy or safety.
If you use it as a reference, please do so at your own judgement and risk. I cannot accept any responsibility for any damage or trouble that may occur.