Hello everyone, Boo here.
This time I'm writing about pressing bearings into the front wheel hub of my bike.
If you've ridden your bike for years without ever thinking about the wheel bearings, the bike feels heavier to push around, or the wheel makes a noise when it turns, the wheel bearings may be the cause.
As the diagram below shows, the weight of the bike (and your own weight) passes through the wheel bearings to the axle shaft, and then to the tyre.
On the XR, just four bearings, two front and two rear, carry the weight of the bike plus the rider.
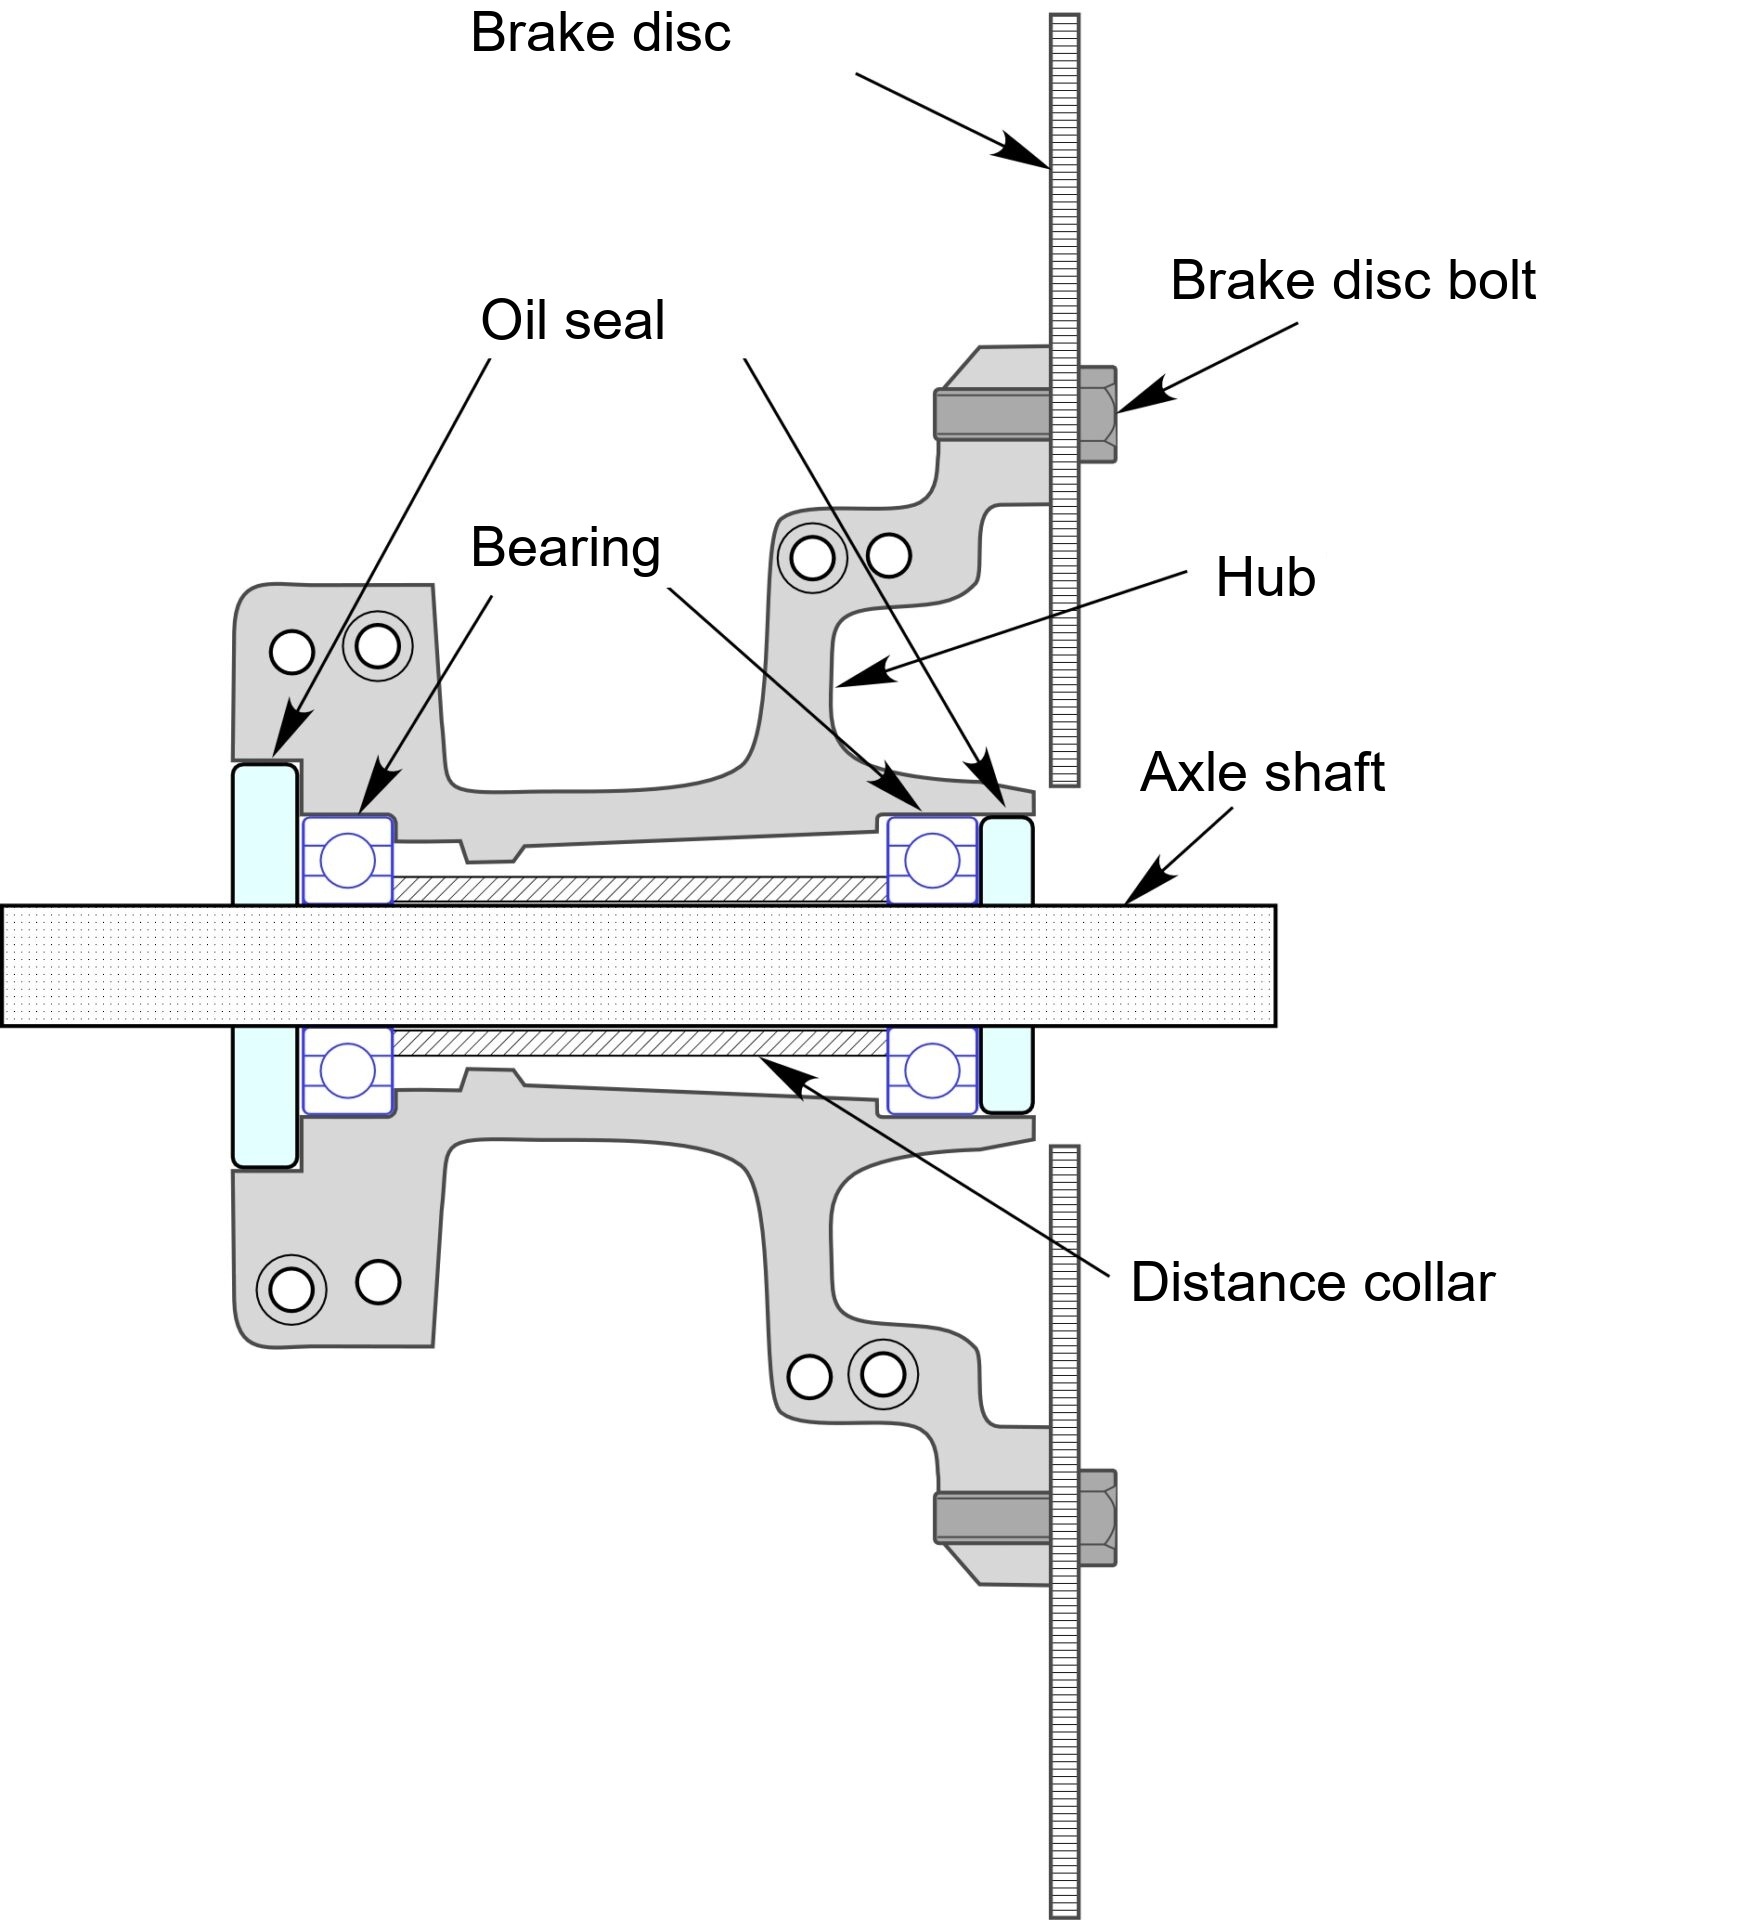
Once you know this, you can see how important wheel bearings are.
So this time, it's about replacing (pressing in) wheel bearings.
What you need
- Bearing installer
- Hammer
- New bearings
- New oil seals
- Vernier calliper (for my method)

Outline of the steps
- Lift the bike so the wheel is off the ground
- Remove the axle shaft and take the wheel and tyre off the bike
- Remove the bearings from the wheel and press in new ones
With the wheel off, the bike is unstable, so take steps to stop it falling over
The actual work
The front wheel hub and bearings are built like the cross-section above.
A side note on rear wheel hubs:
the chain side carries more load, so some have double bearings, and on shaft-drive bikes or bikes with a single-sided swingarm, there may be no bearing on the tyre side.

These are the bearings I bought (photo above).
NTN 6202LLU. I think the XR250 and XR BAJA with conventional (non-USD) forks use the same size.

The bearings were sealed on both sides, but to reduce friction even a little, I removed the seal on the side that faces inwards once fitted.

With the seal off it looks like this. It's packed with grease.

The grease didn't seem to be touching the balls, so I pushed it in with a precision screwdriver.
A metal tool like a precision screwdriver might scratch the bearing, so afterwards I thought I should have used a toothpick.

With the bearings ready, I drive them into the wheel hub.
The thing to watch is that the speedometer-side bearing goes in first.
Why?
(Drawing: Honda XR250 / XR BAJA / XR250 Motard service manual, front wheel hub. Not reproduced here.)
In the Honda service manual (XR250 / XR BAJA / XR250 Motard), the drawing of the front hub shows why.
Look closely at the hub and the bearings in that drawing.
The speedometer-side bearing is driven into the hub as far as it will go, but on the brake disc side there is a slight gap.
This means the depth the bearings are driven in is set from the speedometer side, and adjusted on the brake disc side.
So the order is: first drive the speedometer-side bearing all the way in, then adjust how far the brake disc-side bearing goes in.
Drive the bearings in from the speedometer side
Now let's actually drive in the bearings.
Some people use a socket, but a socket can shift out of position while you're hammering and may damage the bearing or the hub, so I use a dedicated tool.

I was taking photos at the same time, so this one is posed, but this is how I drive it in with a hammer.
In practice I steady it with my hand so it goes in straight.

Here the bearing is driven in.
When the bearing reaches the bottom, the sound of the hammer blows changes.
(I think you'll feel from the sound and the feedback that it won't go any further.)

Next is the brake disc side.
At this point, don't forget to fit the distance collar.
If you forget it, you'll have to take the bearing out again.
Don't forget the distance collar

As on the speedometer side, drive the bearing in without letting it tilt, but don't force it in until it won't go any further.

Drive it in a little at a time, checking how far it has gone.
In the photo above, the gap the precision screwdriver points to is the gap between the bearing and the distance collar.
If this gap isn't right, the outer and inner races of the bearing are pushed out of line and won't turn smoothly.
What are a bearing's "outer race" and "inner race"?
A deep groove ball bearing is made up of an outer race, balls, an inner race and a cage. See JTEKT (Koyo)'s explanation (in Japanese).
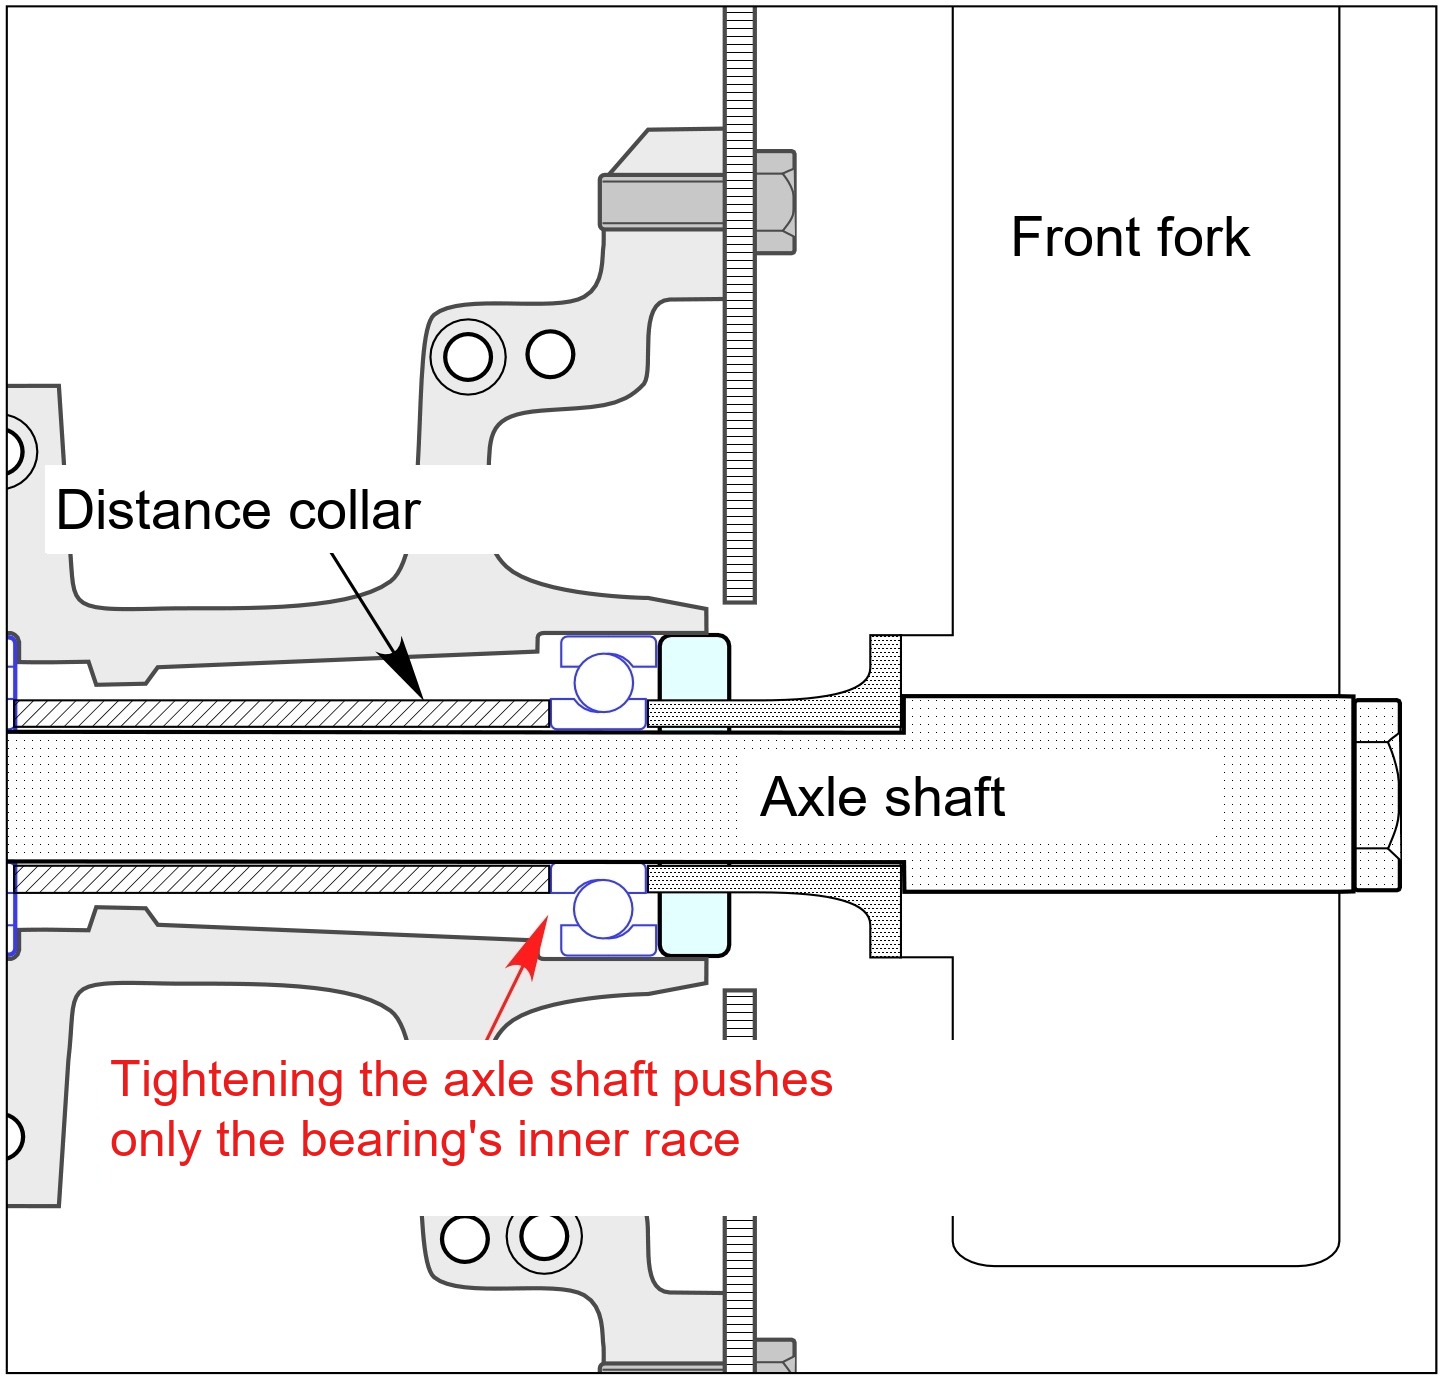
For example, if the bearing isn't driven in far enough, tightening the axle shaft pushes the bearing's inner race, as in the diagram below.
On the other hand, if the bearing is driven in too far, you get the situation in the diagram below.
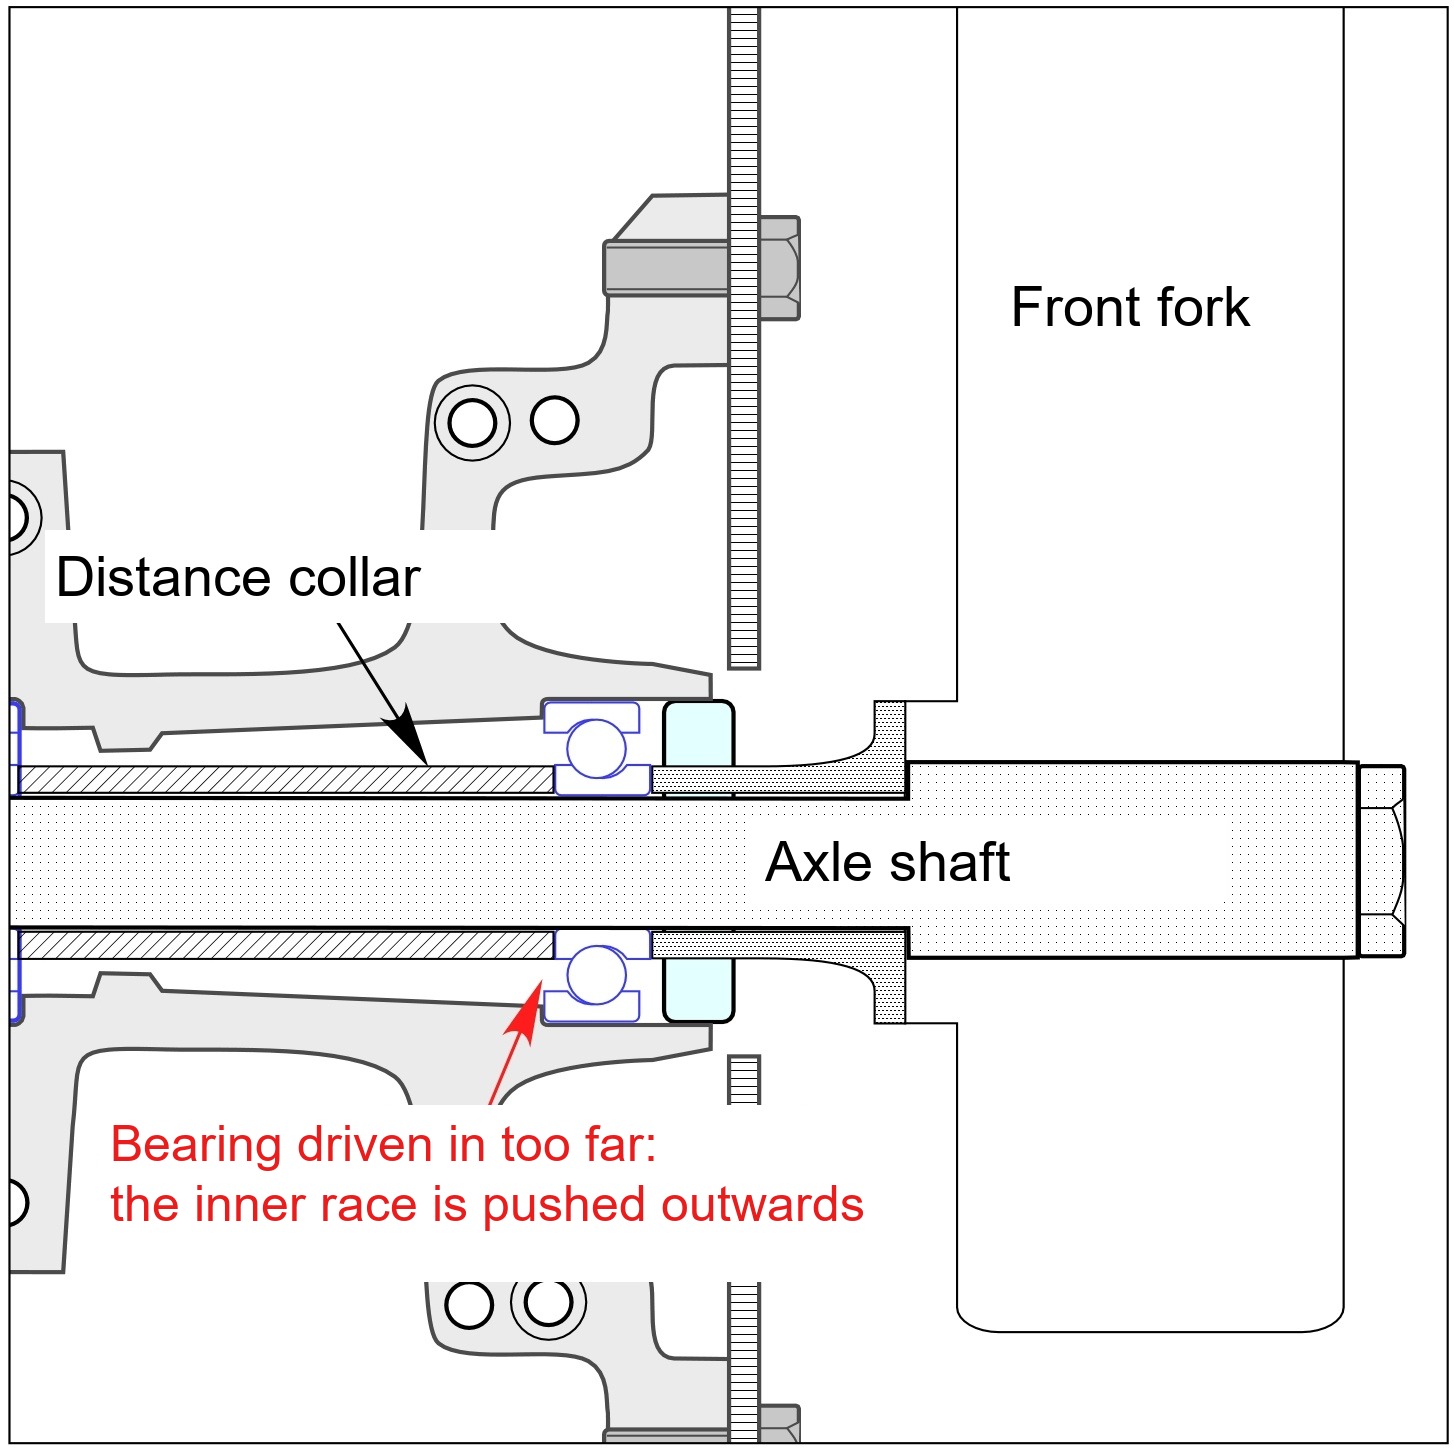
These diagrams show how the outer and inner races get out of line.
The method I show next doesn't solve misalignment between the outer and inner races, but it keeps the two bearings parallel.

This is my own method: to check the bearing hasn't gone in at an angle, I measure how deep it's driven in with a calliper.
I measure at four points, treating the bearing as a clock face: 12, 3, 6 and 9 o'clock. I drive the bearing in until the depth is the same at all four points. I stick masking tape on as markers so I know where I measured.
This assumes, however, that the surface the calliper measures from isn't distorted and that the contact face between the bearing and the hub is square.

In the photo above, for example, the depth is 7.25 mm.

If the depth at one point is less than at the others, I drive the bearing in at that point with a pin punch with a rounded tip.
"Measure with the calliper → tap with the pin punch"
I repeat this until the two bearings are parallel and the distance between the distance collar and the bearing (the "gap" mentioned above) is right.
So how much is "the right distance between the distance collar and the bearing"?
I think it's the distance when the axle shaft is tightened to the correct torque.

As a test, I fitted only the bearings and the distance collar and tightened the front axle shaft to the specified torque.
The bearings and distance collar together measured exactly 80 mm.
As this shows, although I've been calling it a "gap", in reality the gap disappears.
* In the diagrams, the axle shaft is tightened from the right, but in reality it's tightened from the left. Sorry, I drew the axle shaft the wrong way round.

To check, I measured the bearings and the distance collar.
The distance collar on its own is 58.50 mm.

One bearing is 10.95 mm thick.
Two bearings (10.95 mm × 2) plus the distance collar (58.50 mm) add up to 80.40 mm.
That's close to the 80.00 mm above.
I don't think tightening the axle shaft to the specified torque compresses the collar or bearings much, but 80.00 mm is a useful guide.
However, I don't have a tool to measure the length with the bearings and distance collar fitted, so I use the method above of measuring the bearing depth with a calliper.
This keeps the two bearings parallel, but the right depth comes down to feel.
There may be a better way, but I've shared this as one method for pressing in bearings.