Hello everyone.
When restoring or maintaining a bike, the hardest part is often getting corrosion and rust off the engine and other small, fiddly areas.
"There's only so much you can do by hand, but setting up a proper sandblaster is a big step..."
To solve that, I tried using a household pressure washer, a Karcher, to do cheap and environmentally friendly "soda blasting (baking soda blasting)", and tested whether it works.
This is a record of five rounds of trial and error, starting with part 1: preparation and a (possible?) failure!
What is soda blasting (baking soda blasting)?
Soda blasting is blasting that uses "baking soda" as the abrasive. It has three big advantages.
- Environmentally friendly: baking soda is also used in food, so you can just wash it away with water.
- Gentle on materials: it's soft, so it's less aggressive towards aluminium parts and seals.
- Dissolves in water: even if particles are left after blasting, they dissolve when you rinse, which helps avoid problems such as grit inside an engine.
The plan this time is to do this with the pressure of a Karcher (wet blasting).
First, trying soda blasting
In my previous post, I tried soda blasting with a Karcher and found it very effective for cleaning parts.
But I also found these problems:
- Baking soda splashes everywhere
- Baking soda doesn't come out properly (it isn't drawn up well)
So I'm going to work through these problems by trial and error.
First, I'll think about a baking soda container that feeds the soda properly.
What I prepared: a budget DIY set
Ready-made kits are available, but this time I wanted to see how cheaply I could make it from things that are easy to get.
- A Karcher (household pressure washer): whatever you have at home is fine.
- Baking soda: bought with cost in mind.
- Parts for a home-made nozzle: a three-way joint, hoses and so on (from a DIY store).
- A container to draw from: a tank to hold the baking soda mixed with water.

Last time, I simply pushed the suction inlet into the bag of baking soda like this.
With that method, the inlet ended up floating above the baking soda before I knew it, and it stopped drawing up soda.
So I decided to make a baking soda container like the one below.
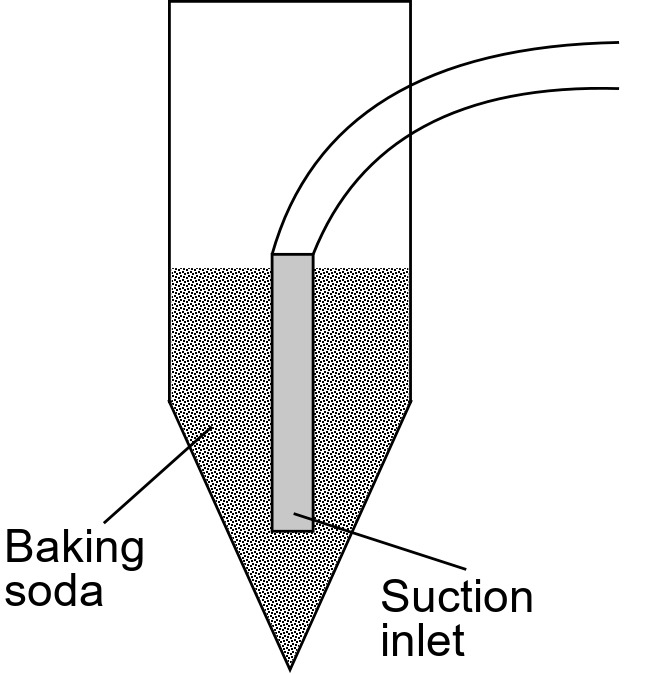
I thought that if the bottom of the container were funnel-shaped, the baking soda would always fall to the bottom under gravity.
Making the baking soda container!
Let's make it.
I looked for materials at a DIY store, but couldn't find anything funnel-shaped with a closed tip like the diagram above.
So I decided to make something similar from PVC pipe, which is easy to work with.
Here's what I got:

10 cm diameter PVC pipe, a reducer to join different pipe sizes, a cap, PVC cement and a saw to cut it.
First, I cut the PVC pipe, which was far too long.

I went with 50 cm for now, and marked the cut with masking tape to keep it as neat as possible.

The saw is small compared with the pipe, so I cut it while turning the pipe.

Once it's cut, glue the parts together with PVC cement.

Glued up. Done!
Just in case, I made the bottom cap a screw-on type so it can be opened and closed.

This is how I plan to use it.
It may be too long overall, but if so I'll cut it down.
You can't make a short one longer, after all.
Once the glue had dried, I cut a slot in the PVC pipe for the hose.

First, drill a pilot hole.

Once the pilot hole is drilled, enlarge it.

Saw a slot down to the hole.

The hose went in nicely.
Now the cap can go on.
Without the cap, water splashing during blasting could get in and make the baking soda damp.

Looking in from the top.
Fill this with baking soda and it'll be perfect!... it should be... I hope it's perfect...
Next, dealing with the baking soda splashing everywhere!
My Karcher blasting series
These are my notes from building a DIY baking soda (wet) blaster with a Karcher pressure washer. The set-up, tools and cautions that finally worked are summarised in my DIY guide.
- First try: baking soda blasting with a Karcher
- Part 1: a funnel-shaped baking soda container (this post)
- Part 2: a splash cabinet, and baking soda that won't feed
- Part 3: feeding the soda from below
- Part 4: clogs and air leaks
- Part 5 (final): what worked
- Baking soda blasting a carburettor
- Wet blasting with glass beads (fork axle holders)
- Wet blasting a rear brake caliper
- Removing blast media thoroughly afterwards
- Does baking soda blasting strip anodising?
- A traffic cone as the media container
- DIY guide: what finally worked