Hello everyone.
Today's post is more trial and error on making baking soda blasting with a Karcher work efficiently.
I should say up front that today I only got things ready; there are no results yet.
For the trial and error so far, see the posts below.
Why won't it draw? Using gravity
Up to last time, I'd tried all sorts of things because the Karcher wouldn't draw up the baking soda properly, but nothing worked.
This time I decided to try a set-up like the diagram below.
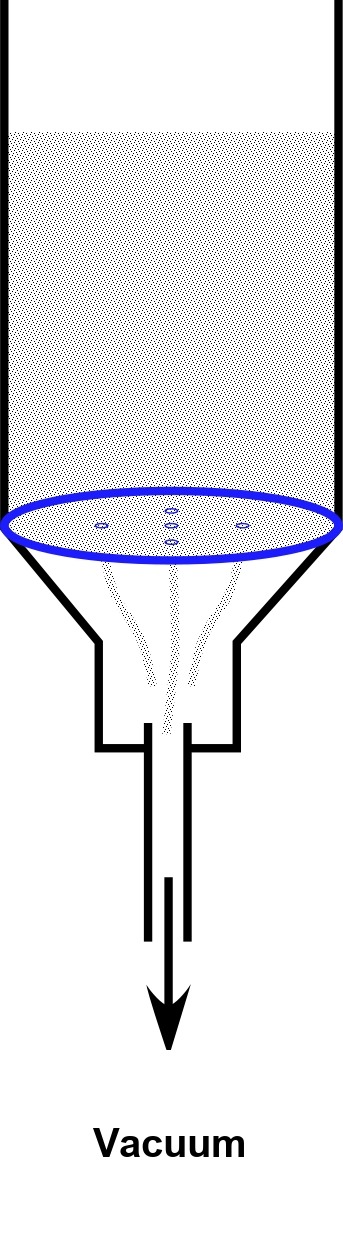
Until now, the baking soda sat in a tube like the one in the diagram above, and a hose pushed in from above drew the soda up by vacuum.
That didn't draw the soda well, so this time I put the hose below the baking soda so that it's drawn by "gravity plus vacuum".
If I simply put the hose at the bottom of the soda, I thought it might draw too much and use up the baking soda quickly, so I decided to put a partition at the bottom to regulate the amount.
The partition has holes, and the baking soda falls through them.
I set it up this way because I might later be able to find the ideal amount of baking soda by changing the size and number of holes.

With the plan decided, let's get going.
First, drill a hole in the bottom of the baking soda box(?) for the hose.
Start small and gradually enlarge the hole.

Partway through drilling, I noticed something.
The bottom of the baking soda box screws off.
To make it easier to work on, I took off just the bottom cap.

Once the hole was a reasonable size, I enlarged it further with a reamer.

Sorry it's out of focus.
I enlarged the hole until the hose would fit.

If air gets in between the hole and the hose, the vacuum is less effective, so I filled the gap between the hose and the hole with silicone.
Before filling it with silicone, clean dirt and oil off the hose and the hole.

Apply silicone to the hose and the hole.
Here I used bathroom silicone sealant.

Here's the hose in the hole with the silicone applied.
Wipe off any excess silicone before it dries, then wait for it to cure.
Stopping it drawing too much

I can't carry on until the silicone cures, so I made the partition to go in the bottom of the baking soda.
The yellow thing in the photo is a compass cutter. I used it to cut out a circle.
Here I used some spare corrugated plastic sheet because it's easy to work with, but baking soda is surprisingly heavy, so a thin metal sheet might be better.

I'd measured the inside diameter of the baking soda box at 10.8 cm, so I cut the circle to that size with the compass cutter.

The cut circle was a little too big, so I trimmed it with scissors to fit inside the box.

Next, drill holes in the plastic sheet for the baking soda to be drawn through.

With a 2.5 mm drill bit, I drilled five holes in a cross pattern.

The partition with holes fitted nicely.
So the weight of the baking soda doesn't bend the partition, I'll start with only a little soda.
All that's left is to put baking soda in and actually try it.
The silicone hasn't cured yet, so the rest will have to wait for next time.
My Karcher blasting series
These are my notes from building a DIY baking soda (wet) blaster with a Karcher pressure washer. The set-up, tools and cautions that finally worked are summarised in my DIY guide.
- First try: baking soda blasting with a Karcher
- Part 1: a funnel-shaped baking soda container
- Part 2: a splash cabinet, and baking soda that won't feed
- Part 3: feeding the soda from below (this post)
- Part 4: clogs and air leaks
- Part 5 (final): what worked
- Baking soda blasting a carburettor
- Wet blasting with glass beads (fork axle holders)
- Wet blasting a rear brake caliper
- Removing blast media thoroughly afterwards
- Does baking soda blasting strip anodising?
- A traffic cone as the media container
- DIY guide: what finally worked