Hello everyone!
In my last post, I shared my 100 km real-world shakedown review after installing the front fender extender.
This time, my X-ADV has hit the crucial 1,000 km milestone since delivery, which means it is time to prep for the ultimate baseline maintenance task: the break-in oil change.
At the 1,000 km mark on a brand-new bike, the internal engine components are settling in, making this the period where metal shavings and debris (sludge) are most likely to accumulate in the oil. Consequently, swapping out both the engine oil and the oil filter at this exact moment is a vital maintenance task that directly dictates the long-term lifespan of your powerplant.
However, performing an oil change on a heavy-duty adventure maxi-scooter like the X-ADV is not as simple as just cracking open a drain bolt like on a standard naked bike. Because this machine is equipped with Honda’s proprietary DCT (Dual Clutch Transmission) technology, you must replace both the main engine oil filter and the dedicated DCT-specific oil filter simultaneously.
To safely and reliably access these filters, you must first remove two primary protective components:
- The rugged, factory aluminum underguard (skid plate) protecting the bottom of the chassis.
- The right-side under fairing (lower plastics).
In this post, utilizing real-world photos from my garage, I will walk you through the correct step-by-step disassembly of these protective fairings and plates.
If you want to tackle your own oil changes or simply want to understand the mechanical layout of the X-ADV, let's dive in!
Why You Must Remove the Plastics and Skid Plate for an X-ADV Oil Change
Before grabbing your tools, let’s clarify exactly why we need to disassemble these guards and fairings. Understanding the "why" behind the process drastically minimizes errors during DIY maintenance.
- Goal of removing the skid plate: To secure clear, unobstructed access to the engine oil filter cartridge.
- Goal of removing the right lower fairing: To gain clean access to the DCT oil filter cover.
Since the X-ADV is engineered with off-road terrain in mind, the underside of the chassis is armored with a thick aluminum plate. Additionally, protective fairing plastics are wrapped tightly around the engine to shield the heart of the DCT system. Stripping these away in the correct sequence dramatically improves your maintenance workflow.
[Step 1] Removing the Skid Plate to Expose the Engine Oil Filter
First, let’s remove the aluminum underguard (skid plate) positioned at the lowest section of the chassis.
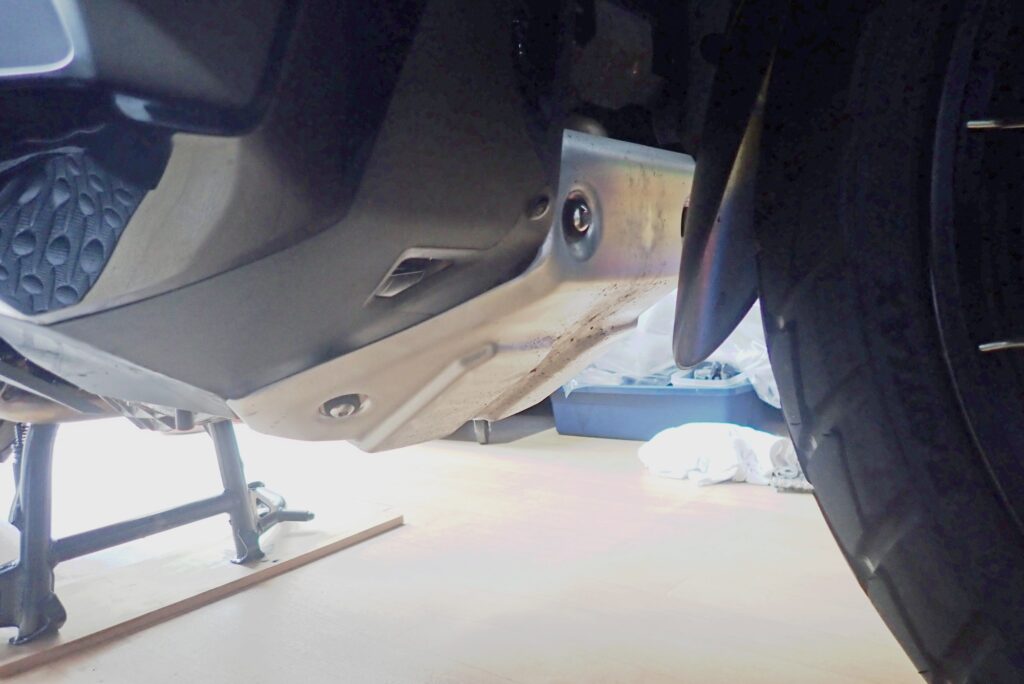
[Image 1: The factory aluminum underguard (skid plate) shielding the underside of the X-ADV chassis]
While this skid plate is a fantastic piece of factory armor that guards the crankcase against stray gravel and bottom-out impacts, leaving it on makes it incredibly difficult to reach the main engine oil filter hidden behind it.
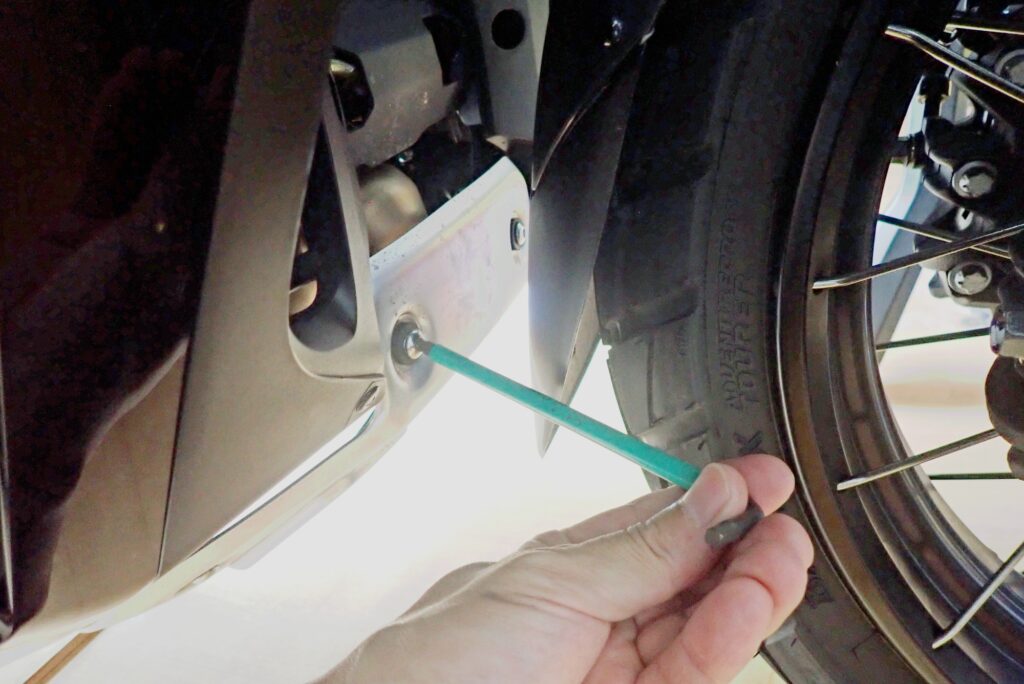
[Image 2: Using a high-quality hex key (Wera hex wrench) to loosen the socket bolts securing the aluminum skid plate]
- Loosen the bolts: Grab an appropriately sized hex key (Allen wrench) and loosen the socket bolts securing the plate in a systematic order.
- Support the plate: As you back out the final fasteners, make sure to support the metal plate with one hand to prevent it from dropping suddenly onto your garage floor.
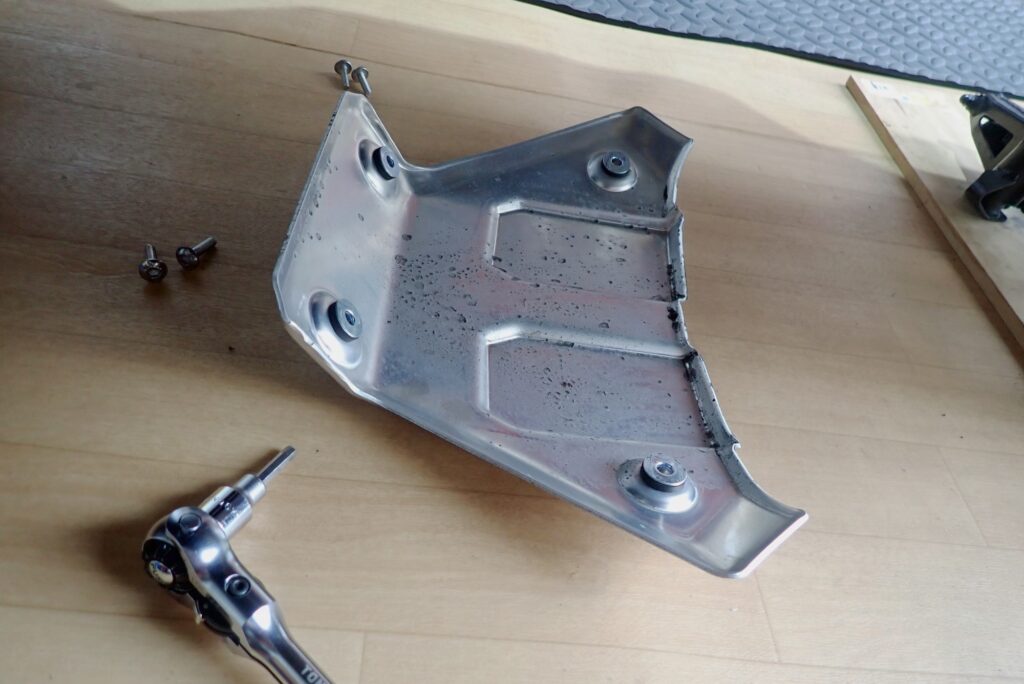
[Image 3: The removed aluminum skid plate displayed next to the ratchet handle and the four removed socket bolts]
- Clean the underside: Once the plate is off, you'll likely notice a layer of fine sand and road dirt caked on its inner face. Take advantage of the oil draining time later to spray this down with parts cleaner and wipe it clean so it goes back on looking pristine.
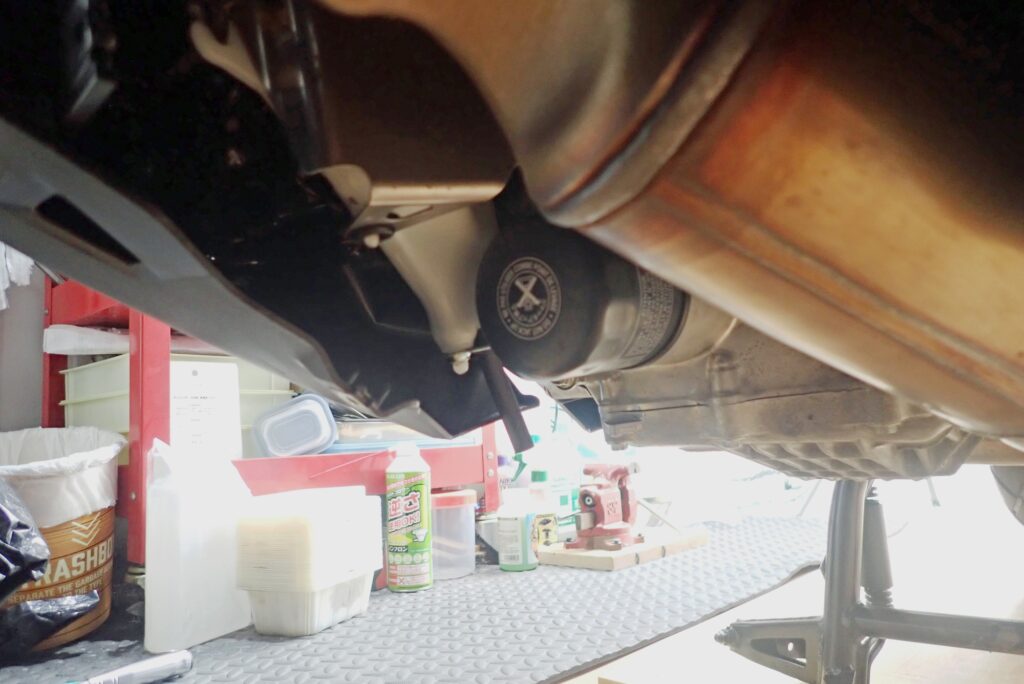
[Image 4: Underside of the crankcase with the skid plate removed, completely exposing the black cartridge-style engine oil filter at the center]
With the underguard out of the way, the spin-on engine oil filter is fully exposed, as shown in the photo. This secures ample clearance to fit a oil filter wrench, guaranteeing a smooth removal of the old filter.
[Step 2] Removing the Right Lower Fairing to Access the DCT Oil Filter
Next, prepare to service the most unique component of the X-ADV's maintenance grid: the DCT (Dual Clutch Transmission) oil filter. Because this filter is tucked inside the right side of the machine, you must remove the lower fairing plastics to work efficiently.
To remove the lower under fairing, you must back out the three bolts indicated by the yellow arrows in the photo below. (Note: Do not touch the bolt indicated by the red arrow).
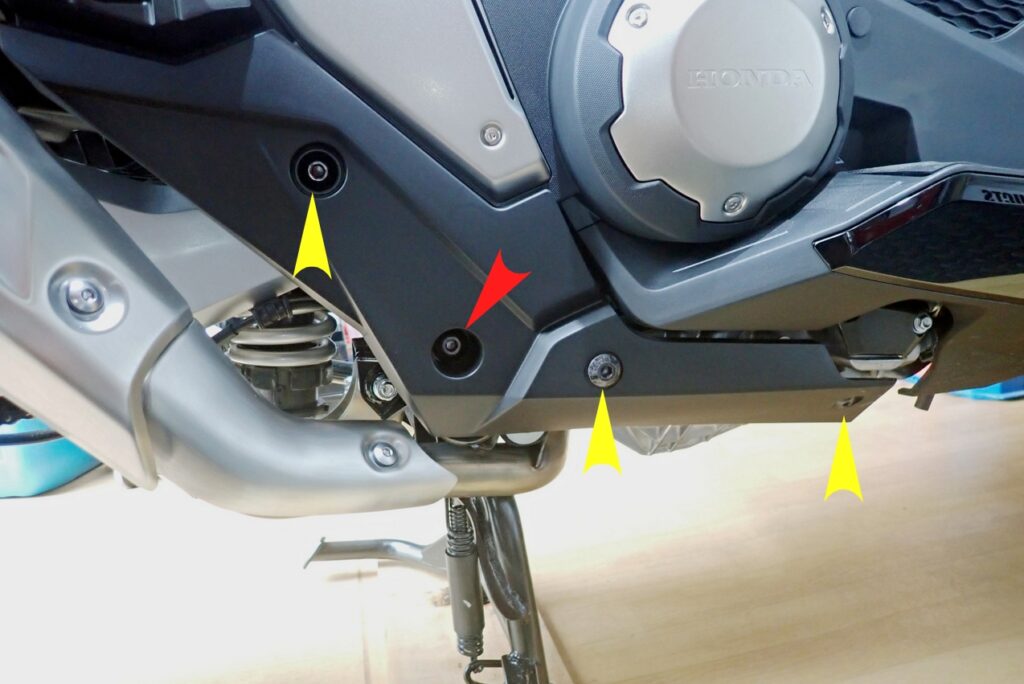
[Image 5: Right lower under fairing area beneath the floorboards, displaying the fasteners to be removed]
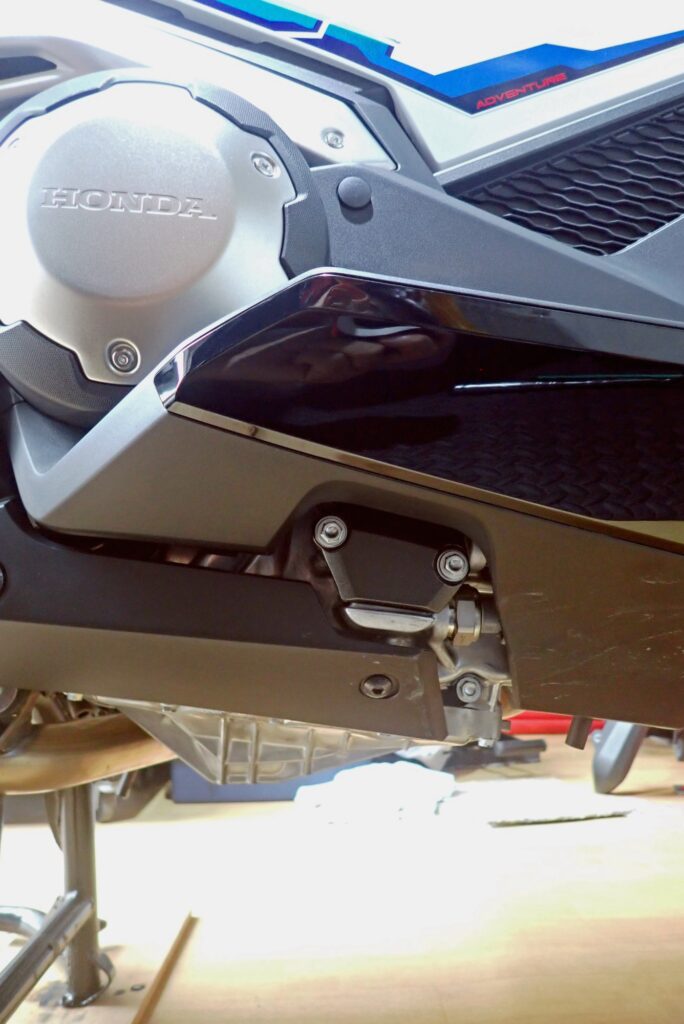
[Image 6: Looking up at the right lower fairing from beneath the bike, showing how the plastics wrap around the DCT cover area]
If you attempt to swap the DCT filter with the fairing still installed, old oil will inevitably spill and run down the inside of your plastics when you break the cover seal. Additionally, forcing tools into such a tight gap risks scratching your exterior fairings. Taking the extra few minutes to remove the lower plastics is the smartest way to ensure a clean job.
[Honda's Build Quality] The Elegance of the "Shoulder Bolt"
While backing out the fairing fasteners, I encountered a highly impressive component. This is the kind of premium manufacturing detail you only appreciate when you roll up your sleeves and wrench on the machine yourself.
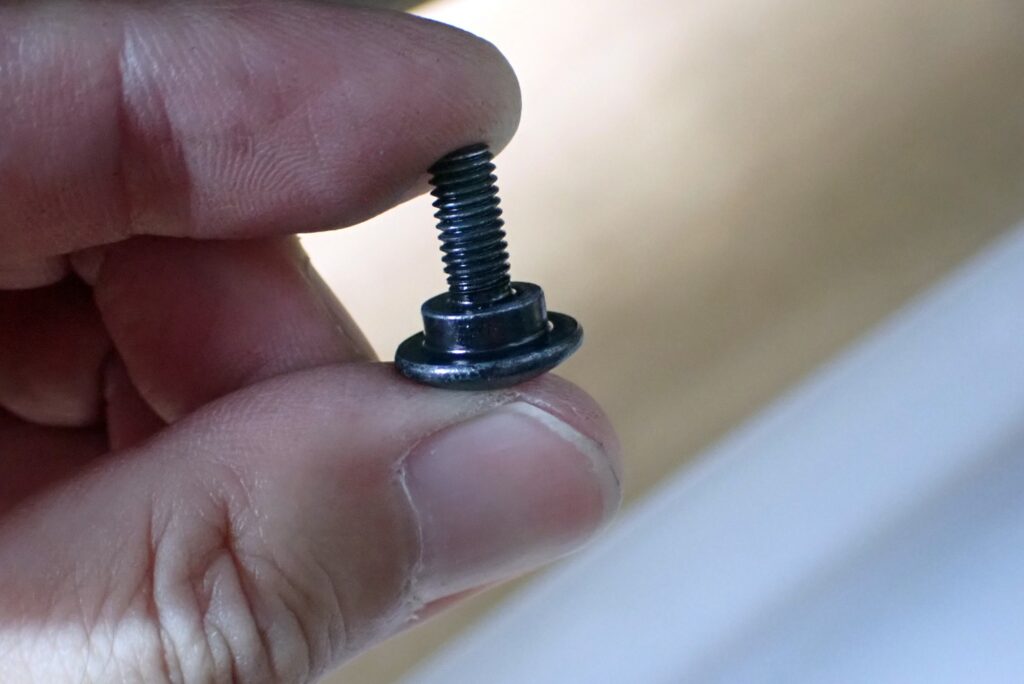
[Image 7: Close-up of the specialized, stepped shoulder bolt used to secure the right lower fairing plastics]
Take a look at this fastener. The bolts securing the plastics are not standard, fully-threaded straight bolts. Instead, they are specialized shoulder bolts (stepped bolts) featuring a smooth, unthreaded metal collar beneath the bolt head.
If you tighten down raw plastic fairings directly with standard bolts, over-torquing can easily crush, warp, or crack the brittle plastic panels.
By utilizing a shoulder bolt, the unthreaded metal collar bottoms out securely against the metal chassis frame. This mechanical stop ensures that no matter how tightly the bolt is run down, it never exerts destructive, crushing pressure on the plastic fairing itself.
Even on hidden fasteners, Honda’s engineering philosophy shines through, proving why the X-ADV is built to premium standards. I was deeply impressed.
[Fairing Removed] Fully Exposing the DCT Oil Filter Cover
Once the shoulder bolts are backed out, apply gentle, uniform pressure to release the plastic tabs (clips) from their retention slots without snapping them.
As shown in the diagram below, the right under fairing is secured by plastic tabs (indicated by the yellow and blue arrows) that press directly into rubber grommets on the chassis.
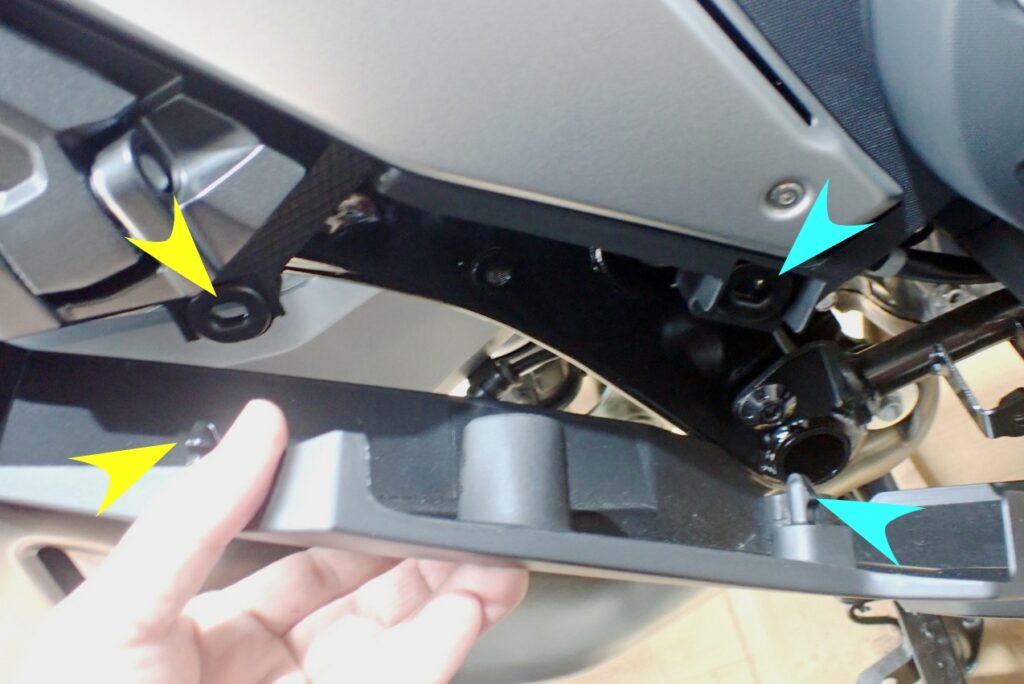
[Image 8: Gently pulling the right under fairing outward and away from the chassis to release the retaining tabs from their grommets]
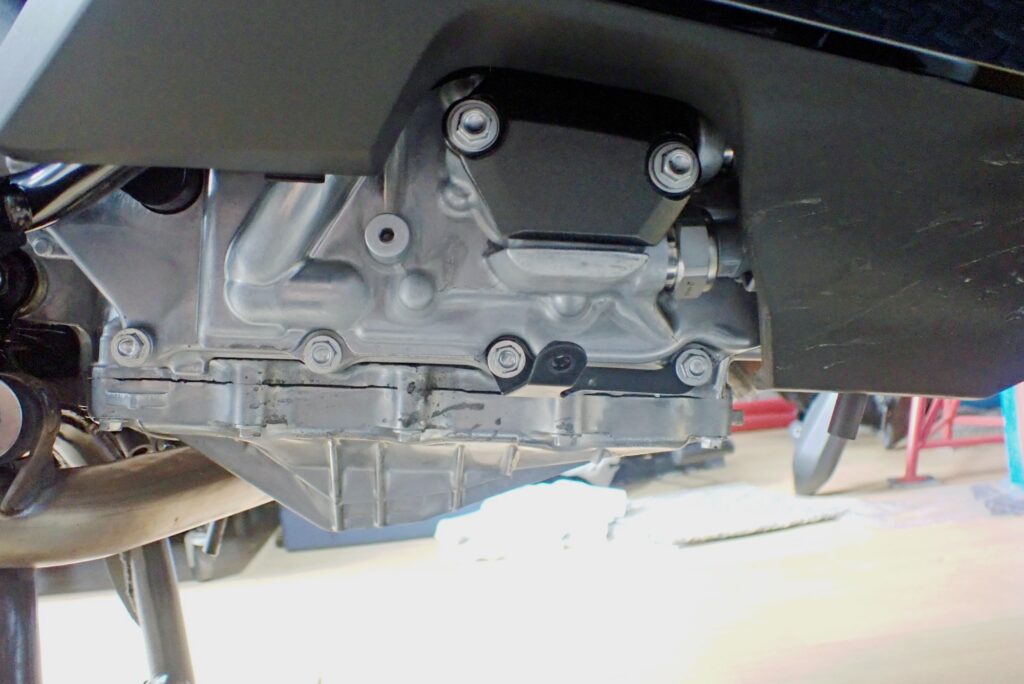
[Image 9: The right-side crankcase area with the lower fairing completely removed, fully exposing the DCT oil filter cover]
With the plastics completely out of the way, the black, triangular DCT oil filter cover (secured by two bolts on the right side of the crankcase) is fully exposed!
With zero fairing interference, you now have a straight, clean line of sight to fit a T-bar wrench or socket socket to pop the cover off.
Recommended Garage Tools and Upgrades for This Job
To ensure a smooth workflow and protect your premium components from cosmetic damage, make sure to stock these essentials in your garage:
- TONE Socket Wrenches & Wera Hex Wrenches When breaking loose the high-torque fasteners on the X-ADV's underguard, standard L-shaped Allen keys can easily twist or slip, risking rounded bolt heads. Utilizing a robust socket wrench paired with a premium hex socket ensures maximum torque specifications are met safely and quickly.
- SurLuster Zero Finish (Advanced Clean & Protect Spray) Stripping away your fairings and skid plates presents the perfect opportunity to detail the hidden inner plastics and frame sections that are normally impossible to reach.Simply spray Zero Finish onto the inner fairing surfaces and wipe down. It aggressively lifts caked-on road dust and greasy grime while laying down a durable glass-like protective coating. Pre-treating your inner fairings with this formula ensures that any oil drips or road spray during future service intervals will slide off effortlessly with a quick wipe down.
Conclusion: Meticulous Preparation Guarantees Flawless Maintenance
That wraps up my guide on removing the aluminum skid plate and the right lower under fairing to prep for the X-ADV's 1,000 km break-in oil change.
Resisting the urge to rush and taking the time to cleanly disassemble your plastics is the single most critical factor in preventing costly garage mistakes—like cross-threading fasteners or scratching your beautiful paintwork. Discovering clever design choices like Honda's stepped shoulder bolts is one of the true joys of DIY wrenching.
Now that the prep work is complete, my next post will cover the final segment: draining the old oil, swapping out the main and DCT filters, and filling her back up with fresh oil. Stay tuned for the complete walkthrough!
Ride safe, and enjoy the ultimate motorcycle life!