Hello everyone!
When you set out to install custom electronics on your machine—whether it's a USB power port, a power distribution hub, or a front-and-rear dashcam system (drive recorder) to protect yourself in an accident—you inevitably run into the most critical phase of the job: routing the wiring.
To hide harnesses neatly inside the chassis and run them safely like a professional mechanic, you need to strip away body panels along the frame. However, while modern motorcycles boast stunning aerodynamic designs, their bodywork is held together by an intricate network of brittle plastic tabs, interlocking clips, and rubber grommets. If you muscle them open with brute force, you run a massive risk of snapping those fragile tabs clean off.
Today, as part one of our electrical upgrade prep, I'll walk you through the safe disassembly procedure for the rear side plastics and the center cover (fuel cap and main ignition switch area).
Utilizing 8 detailed, real-world garage photos, this guide covers hidden tab locations, fastener specs, and the exact "motion sequence" required to remove the panels without snapping a single clip. If you want to master fairing removal as your first step into custom motorcycle electronics, let's dive in!
[Prep Work] Why Remove the Rear Side Plastics and Center Cover?
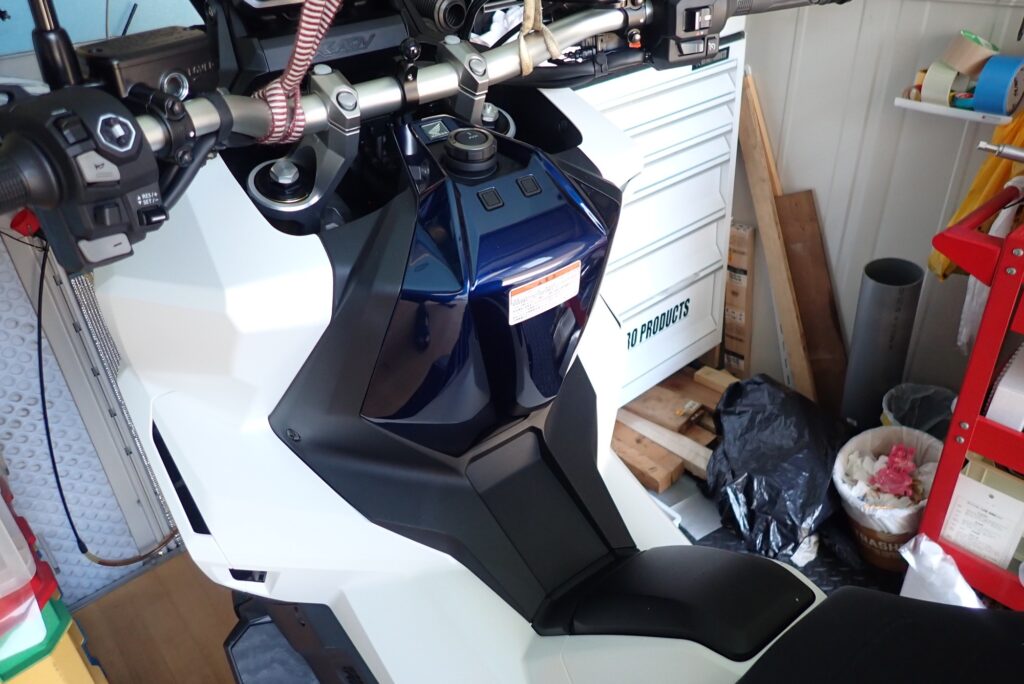
[Image 1: Overview of the X-ADV center cover surrounding the fuel cap and main ignition switch before starting the disassembly process]
When wiring USB sockets or a dashcam onto the X-ADV, you must route harnesses seamlessly from the battery or auxiliary accessory power (ACC) sources all the way to the handlebars and the rear license plate area.
- Removing the Rear Side Plastics: Essential for neatly routing the rear dashcam camera cable around the taillight and organizing accessory power taps under the seat.
- Removing the Center Cover: Crucial for running wiring straight through the center backbone of the chassis to the front cockpit (for phone chargers, USB power, or dashcam monitors).
Mastering the safe removal of these two body panels dramatically boosts your wiring efficiency and ensures a factory-clean finish.
[Step 1] Rear Side Plastics Removal: The Two-Motion "Pop & Slide" Method!
Start by disassembling the rear side plastics extending from beneath the saddle toward the tail section. Removing the X-ADV's rear side plastics requires a specific two-motion technique: pull outward to unseat the pin, then slide backward to disengage the hooks.
1. Back Out the Under-Seat Retaining Bolts
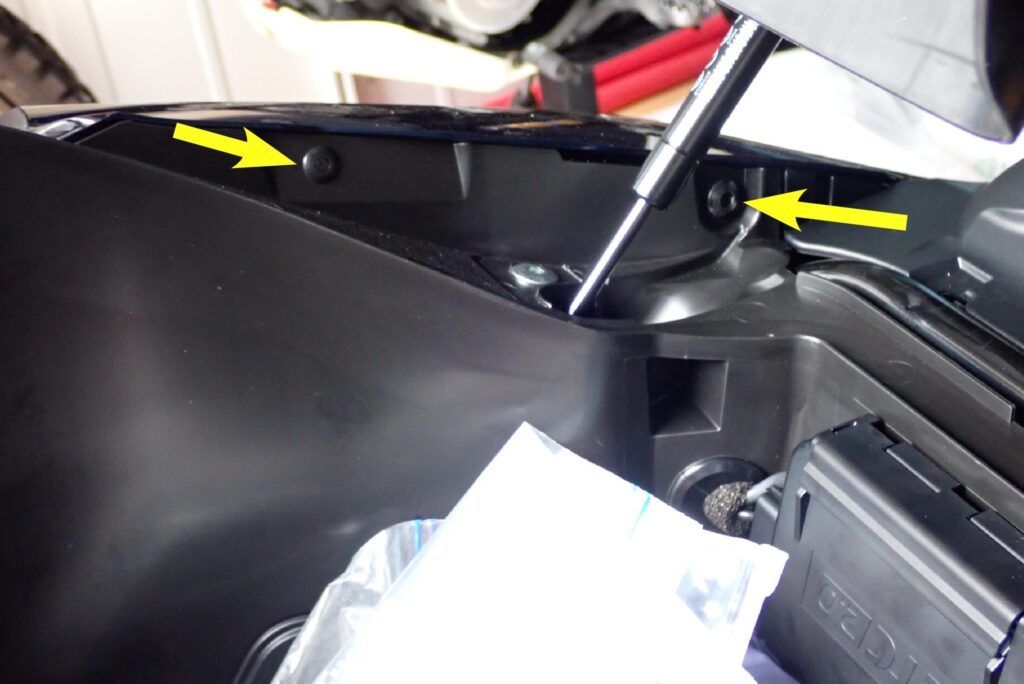
[Image 2: Location of the two retaining bolts securing the rear side plastics on the inner side profile beneath the opened seat]
Open the seat (helmet storage compartment) and locate the two side retaining bolts (indicated by the yellow arrows in the photo) securing the rear side plastics. Back them out using an appropriate hex key.
2. Pull the Front Edge Outward to Release the Grommet Pin
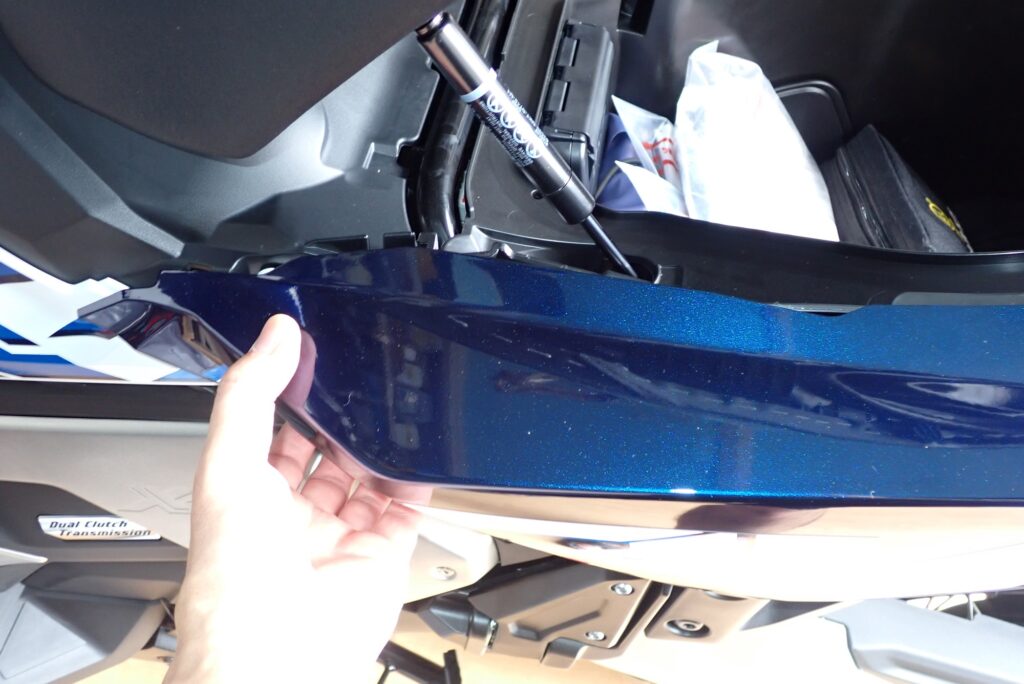
[Image 3: Gently pulling the front edge of the rear side plastics outward away from the chassis]
Once the bolts are removed, grip the forward section of the plastic panel (closer to the center of the bike) and pull it gently outward, away from the frame, as shown in the photo.
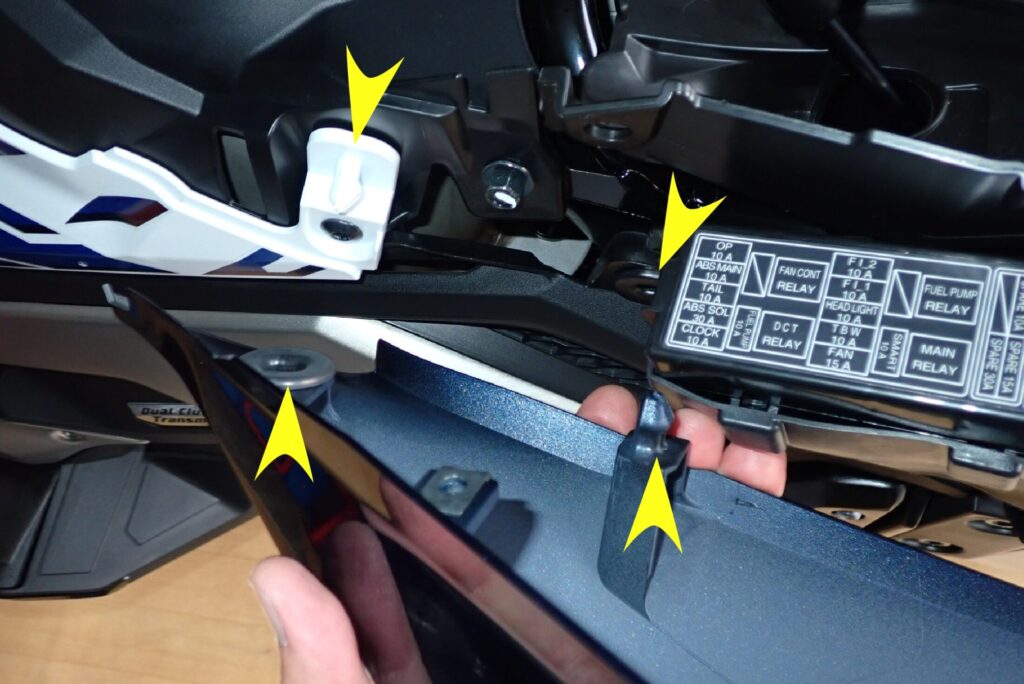
[Image 4: Structure of the white chassis receiving base, rubber grommet, and the round projecting pin on the inner face of the panel]
As highlighted by the yellow arrow in the structural photo, a rubber grommet is seated inside a white plastic chassis mount, accepting a round projecting pin on the inner face of the fairing. Pulling the panel outward will cause this pin to pop free from the grommet with a satisfying click.
(Note: Photo 4 was taken after the panel was completely removed. At this stage, the panel is still anchored at the rear, so do not attempt to pull it entirely off yet!)
3. Slide the Entire Panel Backward to Disengage the Rear Hooks
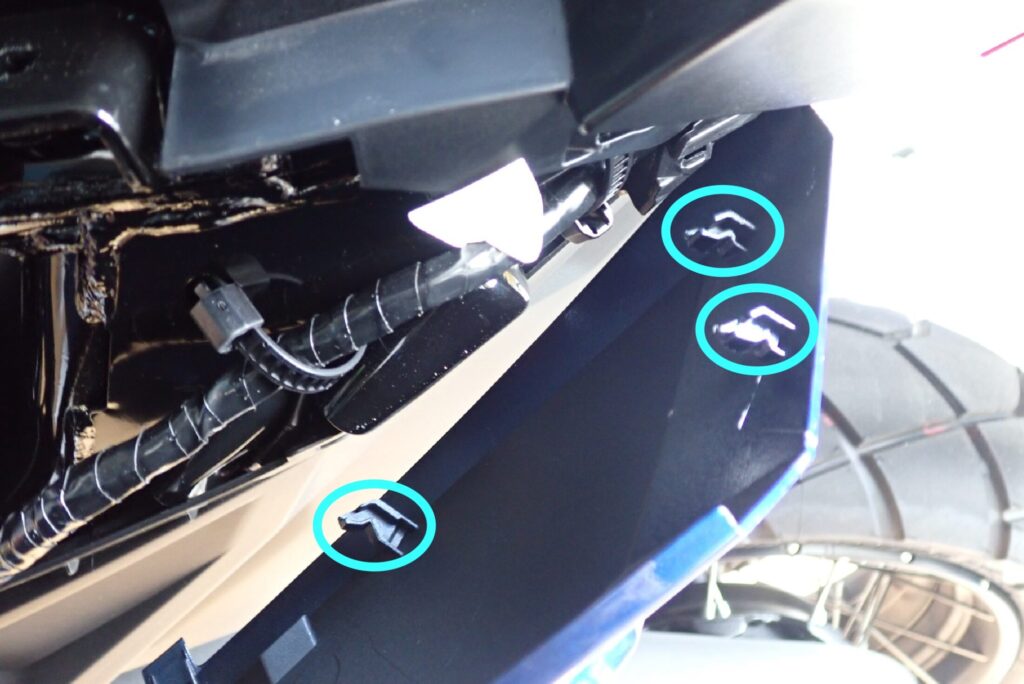
[Image 5: Underside rear view of the removed side plastic showing the three slide-in hook tabs (blue circles)]
Once the forward pin pops free, never yank the panel outward with force!
As shown by the blue circles in the photo, the rear section of the fairing features three flat, hook-shaped tabs that slide into matching receiving slots on the chassis frame (blue arrows in the photo below).
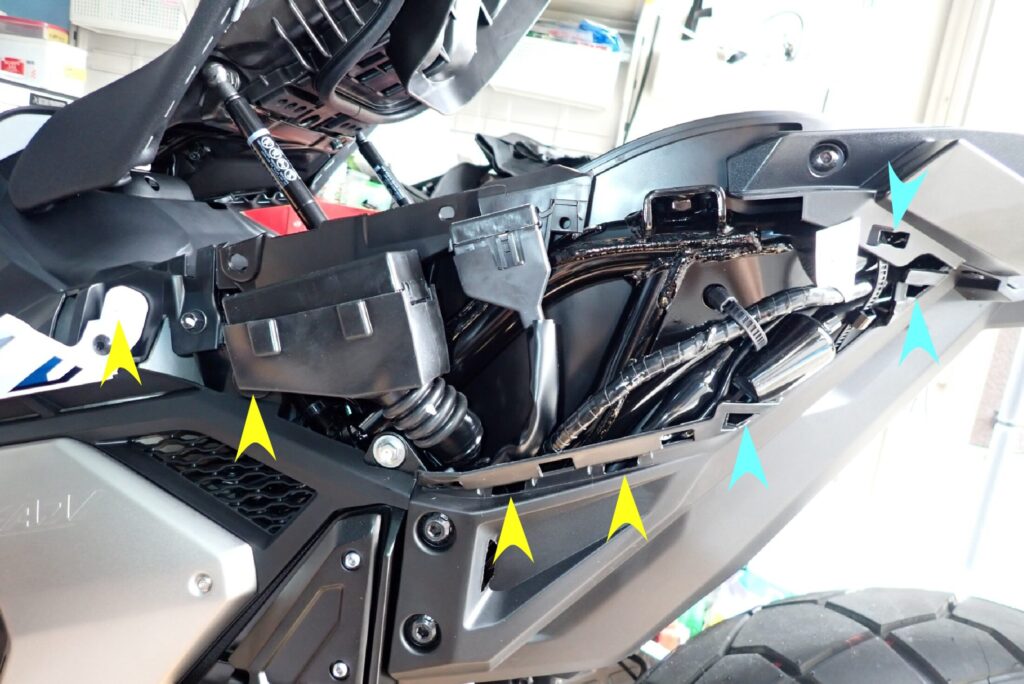
[Image 6: Exposed chassis frame structure after panel removal, showing the grommet location (yellow arrow) and slide slot locations (blue arrows)]
With the front section unseated, hold the panel parallel to the bike and slowly slide the entire piece toward the rear of the vehicle. The three rear hooks will disengage smoothly from their slots, allowing you to remove the rear side plastics cleanly.
[Step 2] Center Cover Removal: Releasing Push Rivets and Mapping Hidden Tabs
Next, move to the center cover section wrapping around the smart key ignition switch and fuel filler cap.
1. Reassemble/Remove the Upper Push Rivets (Plastic Clips)
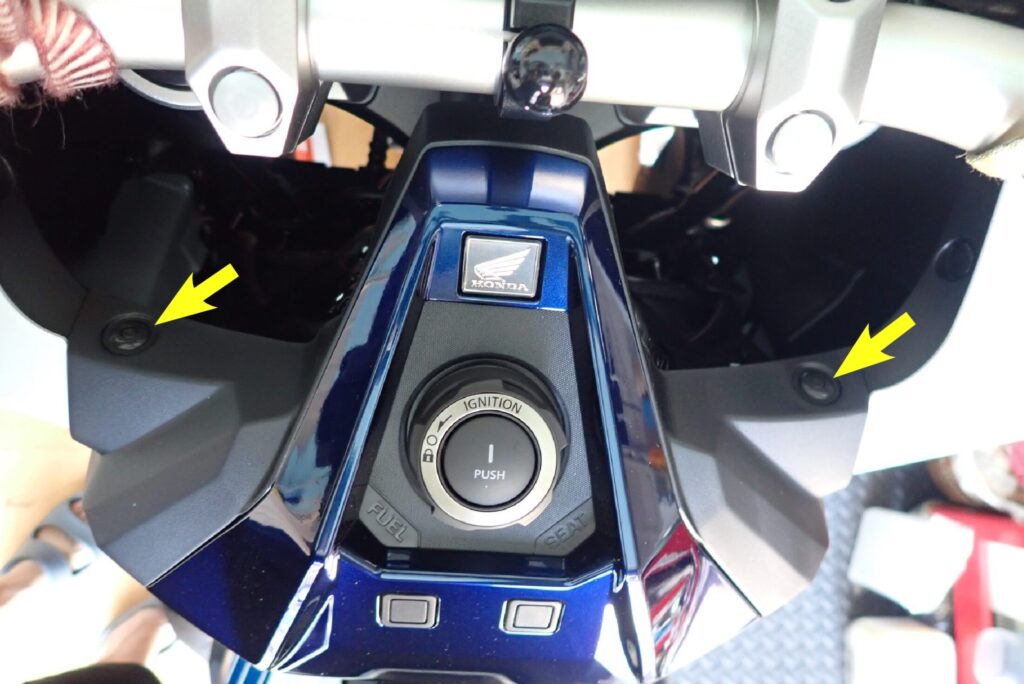
[Image 7: Locations of the two plastic push-rivet clips on the upper left and right sides of the ignition switch]
Locate the two plastic push rivets (yellow arrows in the photo) on the upper left and right sides of the main ignition switch near the base of the handlebars. Use a small screwdriver or pin punch to lightly press the center pin inward to unlock the rivet, then pull the clip out. Remove any nearby mounting screws/bolts as well.
2. Map the Hidden Retention Tabs on the Underside
The center cover is locked securely onto the frame by concealed plastic tabs on its underside. Knowing their exact locations is the ultimate secret to preventing cracked plastics.
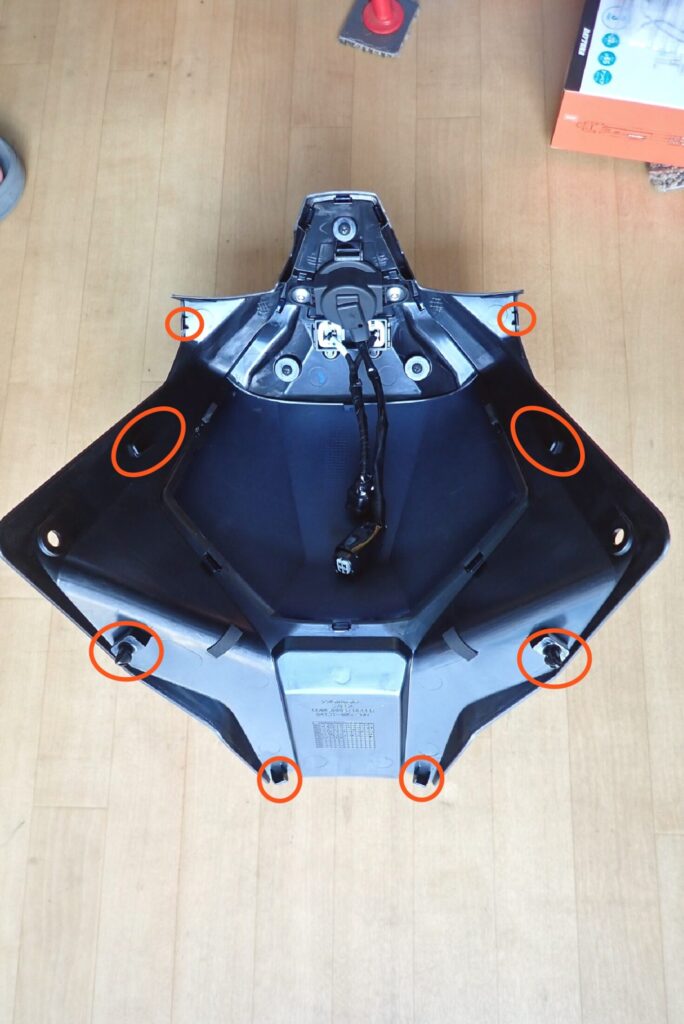
[Image 8: Underside view of the center cover highlighting the positions of the plastic tabs and pins (red circles)]
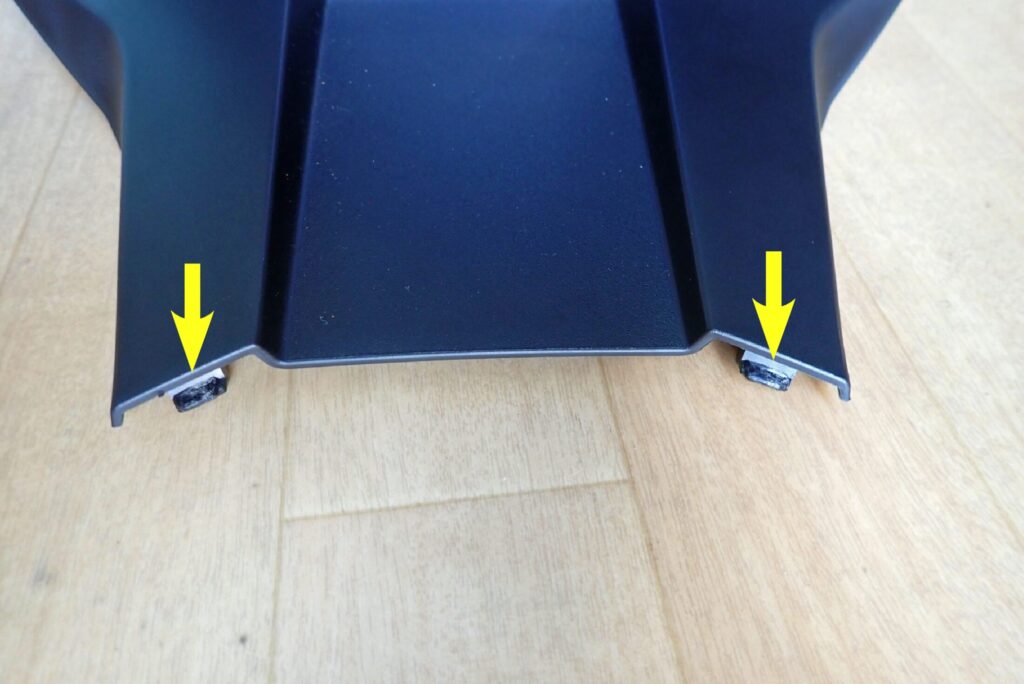
[Image 9: Close-up of the hook-style insertion tab located at the lower front tip of the center cover]
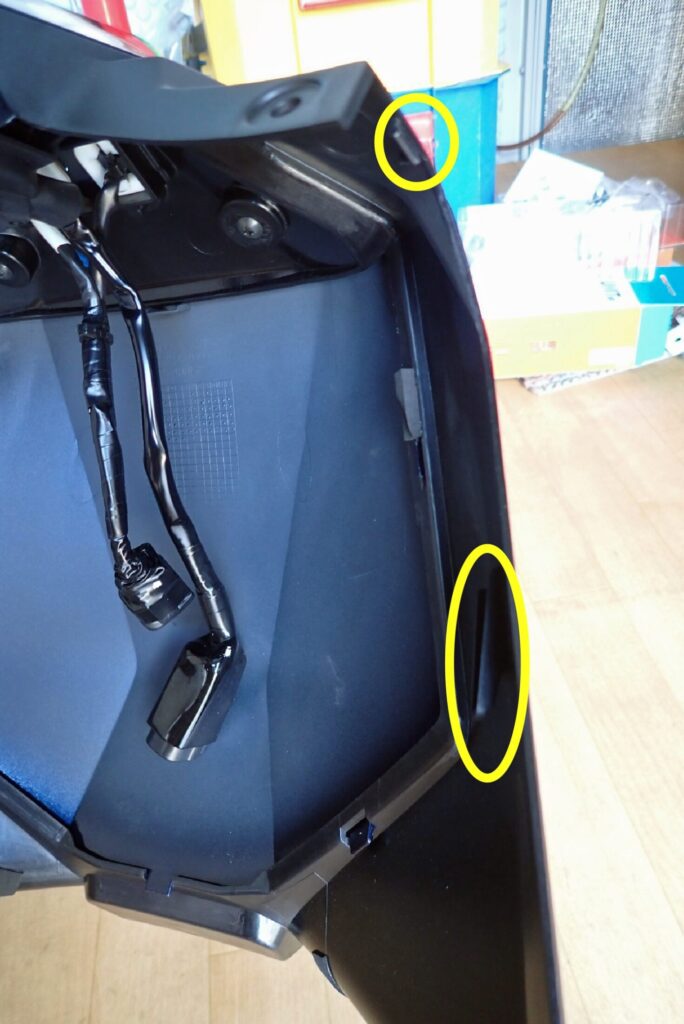
[Image 10: Close-up of the upper retaining tab structure on the underside of the left center panel]
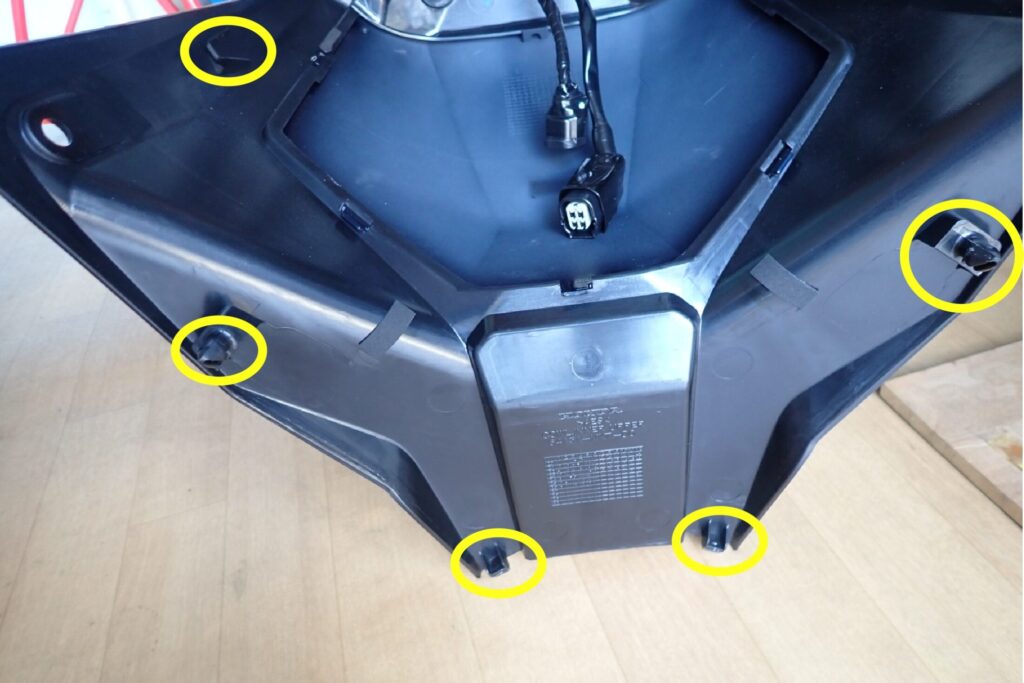
[Image 11: Complete underside view of the center cover highlighting all tab and mounting pin locations (yellow circles)]
Study the yellow and red circles across the four photos above to locate the retention tabs along the front tip, sides, and underside.
When lifting the cover, keep these tab locations in mind. Instead of twisting or prying at harsh angles, apply firm, perpendicular pressure straight outward to release each locking tab one by one ("pop!").
3. Unplug the Main Ignition Harness Connectors
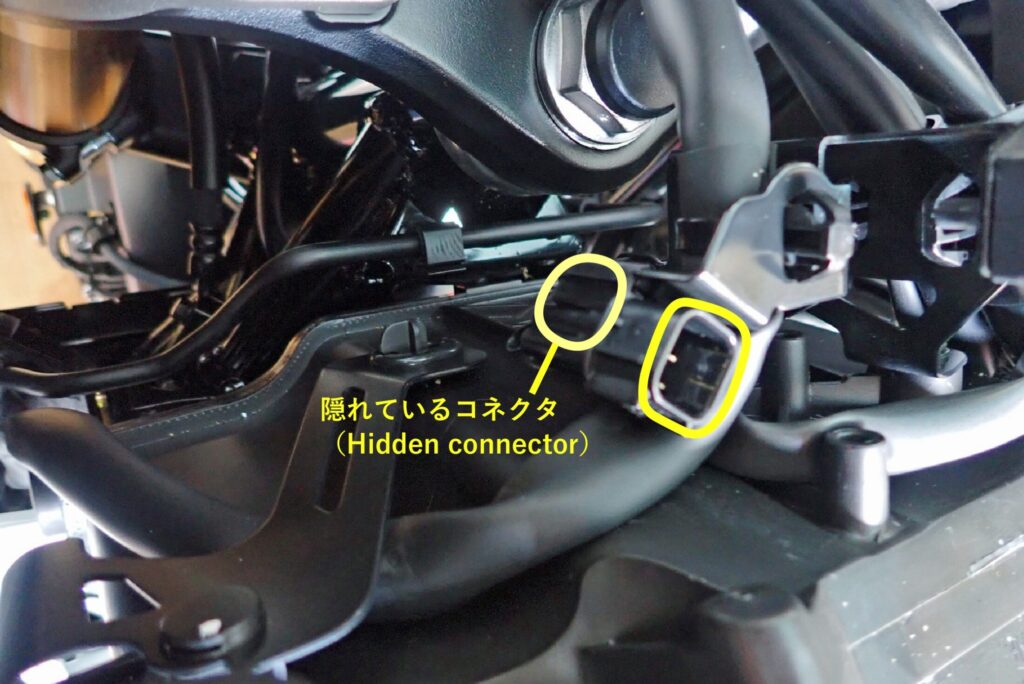
[Image 12: View of the two electrical wiring connectors joining the center cover components to the main chassis harness]
Once the center cover unlatches from the chassis, you will see two electrical wiring harnesses connecting the main switch assembly to the bike.
These connectors feature locking mechanisms to prevent them from vibrating loose during rides. Press down firmly on the release tab while pulling the connector bodies apart to disconnect them safely.
(Note: The camera angle in Photo 12 looks upward toward the front end; locate the stem nut and front fork tops in the upper frame of the photo to orient your perspective.)
3 Essential Workshop Tools to Prevent Broken Tabs
To achieve a professional finish and protect your expensive OEM fairings from cracking or scratching, keep these three essential tools in your garage:
- amon Panel Removal Tool Kit (Trim Pry Tools) Soft, durable plastic wedge tools. Inserting these into panel seams provides leverage to pop plastic clips and pins free without marring painted surfaces or snapping tabs.
- WAKO'S SSG Super Silicone Grease Apply a thin layer of silicone grease to rubber grommet holes and plastic tab posts before reassembly. This reduces friction dramatically, making panels snap together effortlessly and ensuring smooth removal during future maintenance.
Conclusion: Master the Slide Direction and Tab Locations for Stress-Free DIY Disassembly
That wraps up our guide on safely removing the rear side plastics and center cover on the Honda X-ADV.
- Rear Side Plastics: Always follow the two-motion rule: pull outward at the front, then slide backward.
- Center Cover: Remove all push rivets, map the hidden underside tabs, pull straight outward, and depress the release pins on the harness connectors.
- Work Smart: Use plastic trim tools rather than raw fingers or metal screwdrivers to protect your bodywork.
Once you understand the hidden interlocking mechanisms, stripping motorcycle plastics becomes a predictable, stress-free process.
Now that our body panels are off and our wiring channels are completely exposed, stay tuned for the next installment: [Wiring Installation] Step-by-Step DIY Guide: Installing a USB Charger, Daytona D-UNIT, and Dashcam on the X-ADV!
Ride safe, and enjoy the ultimate motorcycle life!