Hello everyone.
Today I'm going to show how I laced (assembled) a spoked motorcycle wheel.
When a spoked wheel gets rusty or dirty, it is very hard to clean while it is still assembled, isn't it?
You may think "I'd love to take it apart and clean it properly!", but hold back because "What if I can't put it back together...?"
Here I show how I put a dismantled spoked wheel back together.
Before you take the wheel apart, I recommend taking lots of photos to record how the hub, spokes and rim are positioned relative to each other.
You can use the photos to rebuild it, and if you think about which photos will help you rebuild it as you take them, you will also come to understand how the wheel is built.
What you need
- Wheel rim, spokes, spoke nipples, hub
- (If you clean the parts before lacing) rags, cleaner, etc.
- Phillips or flat-blade screwdriver (to tighten the nipples)
- Spoke (nipple) wrench
- Water-resistant grease
Steps
Here I use the front wheel of my Honda XR250 (the Japan-market XR250 BAJA / MD30) as an example. I am not using genuine spokes, but DACHI stainless steel spokes (a Japanese aftermarket brand).
Clean each part
Clean the places that are hard to reach once the spokes are in, while you can.

The hub has been powder coated, so I cleaned it with Plexus.

The rim is also a pain to clean once the spokes are in, so I wiped it down now.
There is no photo, but I also cleaned the spokes with Plexus.
If there are several types of spoke, sort them first
Check the spokes again in the parts list.
There is only one spoke part number, so there is definitely only one type. By the way, the XR's rear wheel has two types of spoke, so if you use this as a reference for a rear wheel, be careful about the spoke types.

A parts list and a service manual are handy for checking all sorts of things when you work on your bike
To explain the structure of the hub and the names I use from here on, here is a cross-section of the hub.
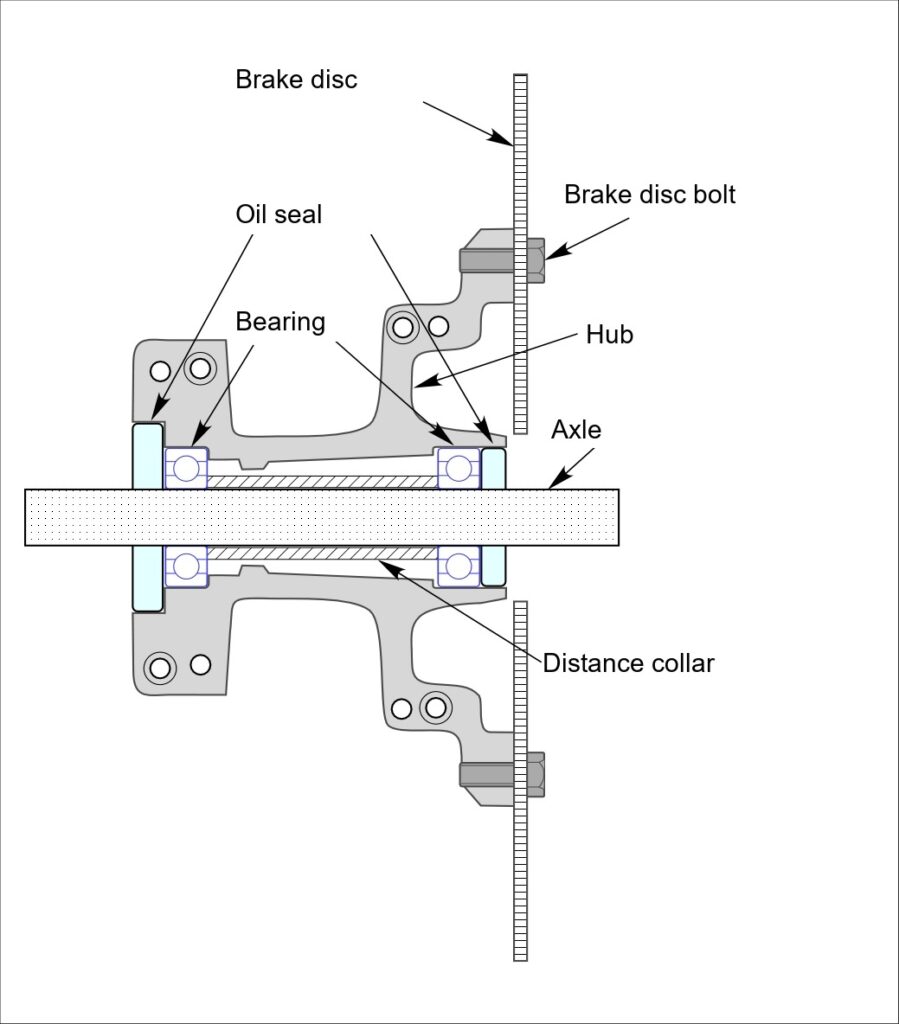
This is a cross-section of the hub. Drawing it reminded me that what holds the bike up is the front and rear wheel bearings.
Wheel bearings started to seem very important.
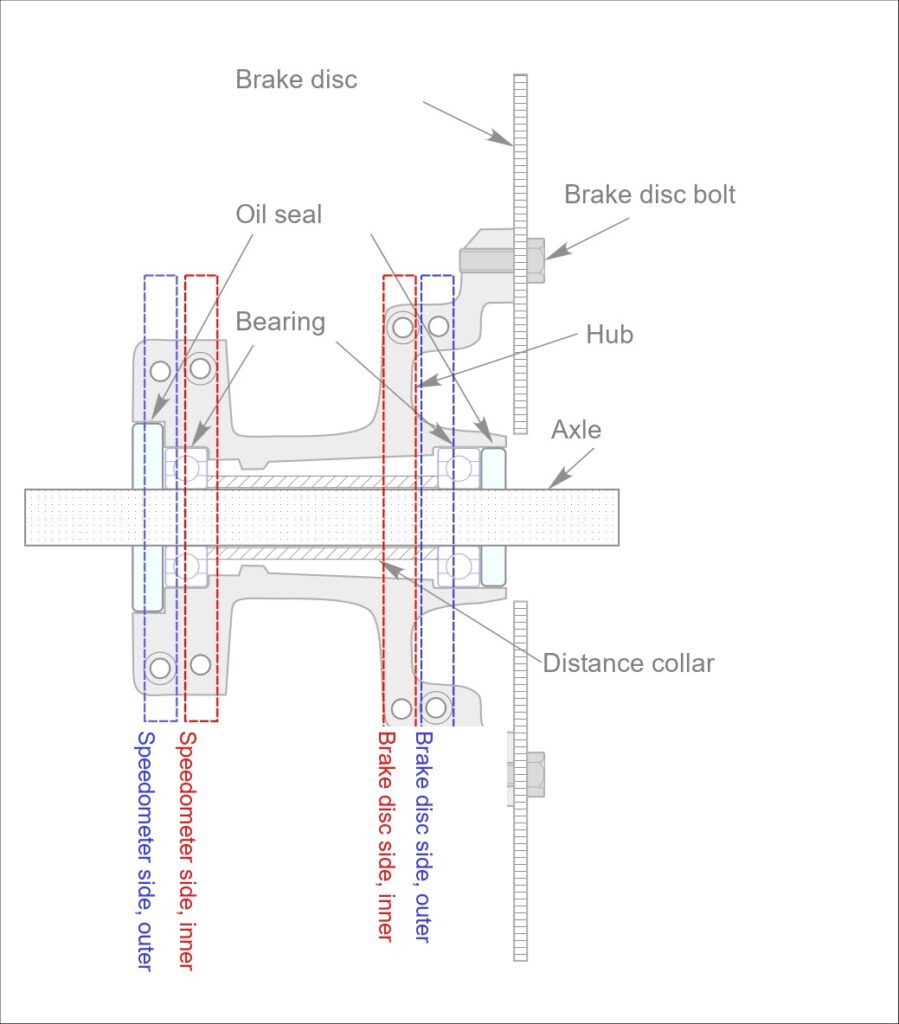
From here on I will explain which holes in the hub each spoke goes through, so please refer to the diagram below.
Put the spokes through the hub
On the brake disc side of the hub (the speedometer gear side is fine too), put spokes into the inner holes (the side further from the fork leg).
The first spoke can go in any hole. From the second one onwards you just keep putting them in, but the last one needs care.

The first spoke slides straight in. It's easy at the start...
Keep putting spokes into the hub: here all the inner spokes on the brake disc side are in.

There are 9 spokes in. Repeat this three more times and all the spokes are in the hub.
The XR's front wheel has 36 spokes in total, made up like this:
Brake disc side, inner: 9
Brake disc side, outer: 9
Speedometer gear side, inner: 9
Speedometer gear side, outer: 9
As an aside...
I don't think genuine spokes would have a problem, but this time I used DACHI spokes, which are thicker than genuine ones, and in some places they interfered with the hub.
The thick powder coat plus powder clear coat on this hub may also have contributed.
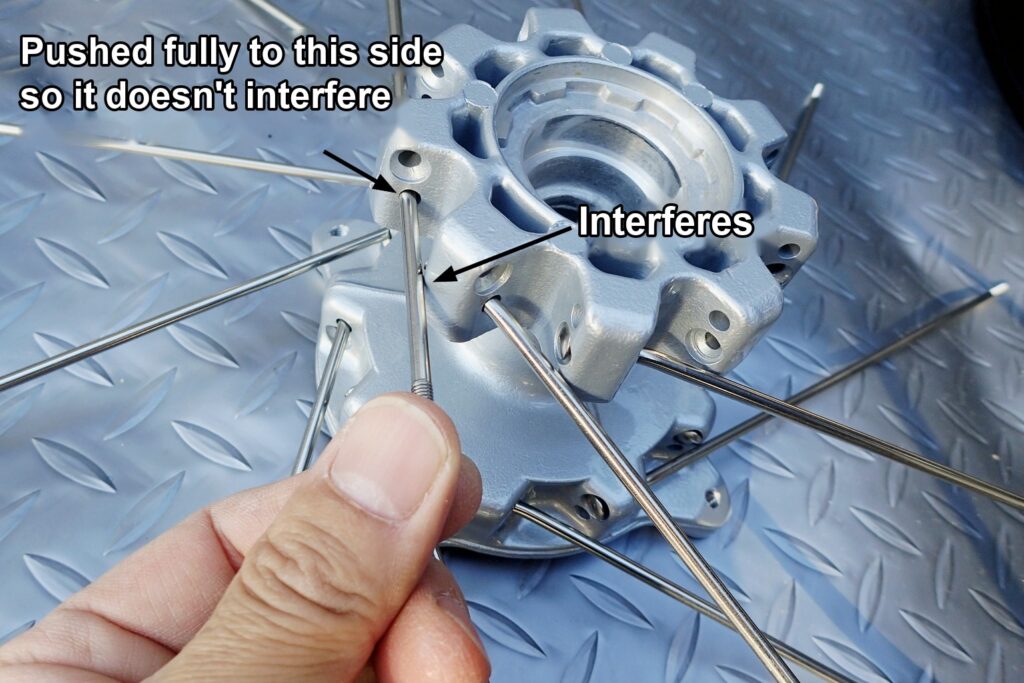
I didn't want the spokes scratched or the paint chipped where they touched, so I put paper over those spots while I worked.
I think the interference happened because I used DACHI spokes, which are thicker than genuine. With genuine spokes I don't think it would get in the way this badly.
Now, the last spoke has to go in while avoiding the spoke next to it, but at the angle in the photo below, the last spoke won't go in.
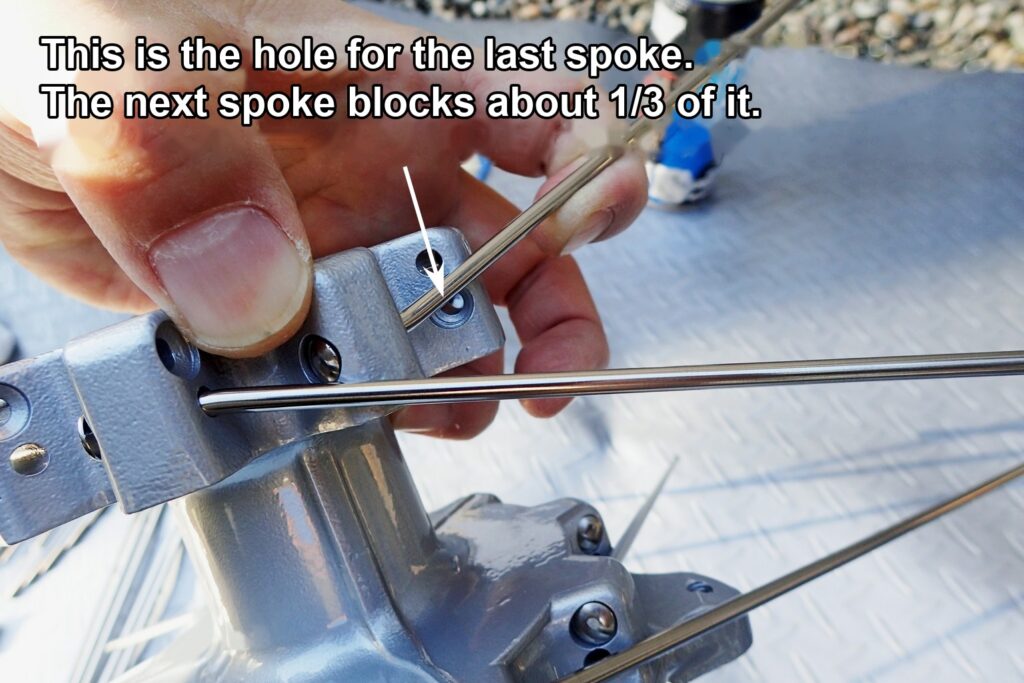
At this point I panicked ("What? It won't go in..."), pulled out all the spokes and tried various orders, but the last spoke still wouldn't go in...
So change the angle of the spoke next to the last one.
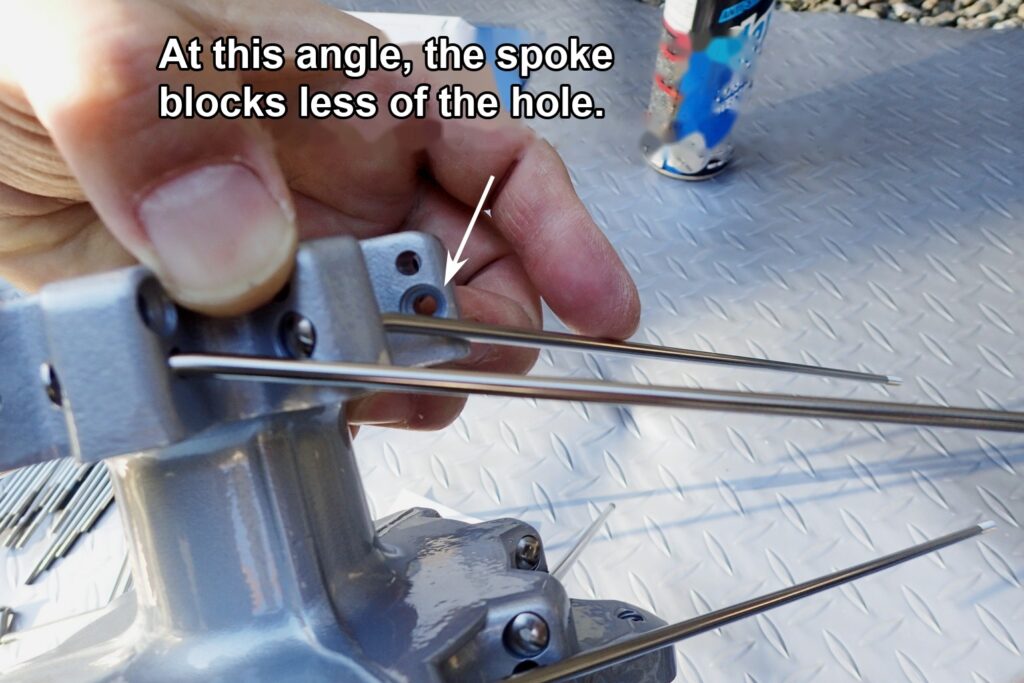
Even after changing the angle of the spoke, I still had to bend the neighbouring spoke a little with some force to get the last one in.
Once the inner spokes on one side of the hub are in, turn the hub over and put in the inner spokes on the other side.
Once the inner spokes on both the brake disc side and the speedometer gear side are in, put in the outer spokes in the same way.
With all the spokes in, it should look like this.

It made me think of a starfish. Or a sea urchin?
Now place the wheel rim over it.

Now it's starting to look like a wheel, and I'm getting excited
Loosely assemble the spokes and rim with the nipples
Now connect the rim and the spokes with the nipples.
It takes extra time, but first assemble everything loosely.
Here the question is: which spoke goes into which hole in the rim?
If you look closely, the nipple holes in the rim are angled in different directions.
In the photo below, the top of the photo is "up" and the right of the photo is "right".
Looking closely, you can see that the direction of the nipple holes repeats in this pattern:
* → up, right → down, left → up, left → down, right → *
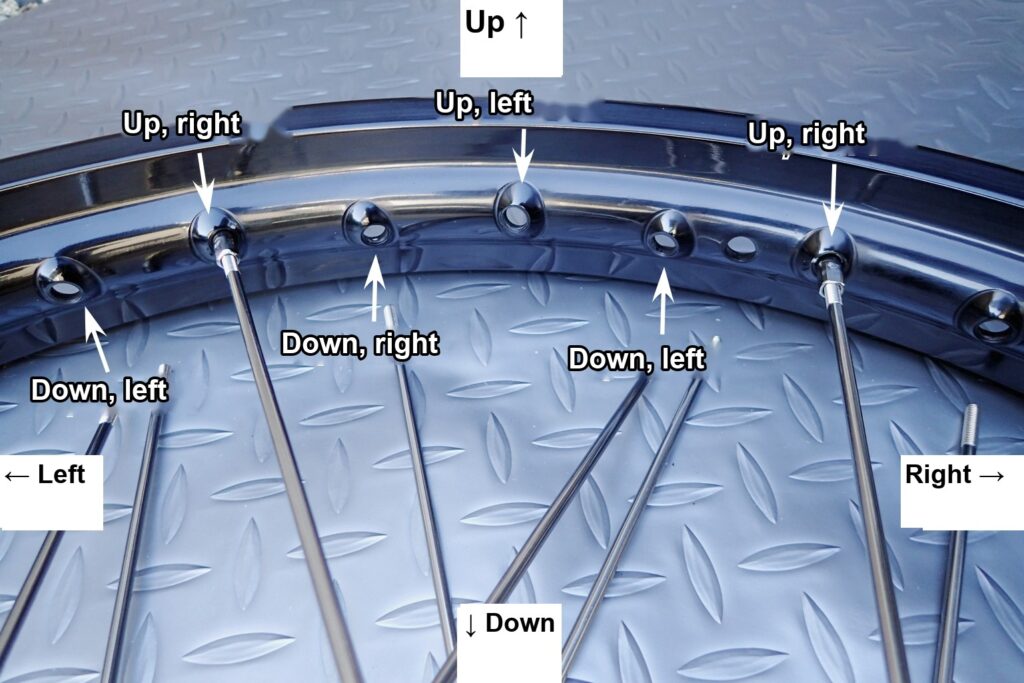
For example, with the rim as in the photo above and the brake disc side of the hub facing up, the brake disc side spokes go into the holes pointing "up" in the photo.
Right and left change as you turn the hub, so for the first spoke, check up/down and try either a right-pointing or a left-pointing hole.
If the hub or spokes seem to be under strain, or a spoke touches the hub, try switching between right and left.
Start by connecting four spokes to nipples.
In the photo below, the two spokes with pale yellow masking tape both go into "down (speedometer side), left" holes, as in the photo above.
There are 36 spokes and 4 types of hub hole, so there are 9 sets of these 4 combinations.
In other words, repeat the combinations in the table and photo below 9 times and the lacing is done.
This is only loose assembly, so just screw the nipples onto the spokes a little way.
| Rim hole | Spoke position |
|---|---|
| Down, left | Speedometer gear side, inner |
| Up, left | Brake disc side, inner |
| Down, right | Speedometer gear side, outer |
| Up, right | Brake disc side, outer |
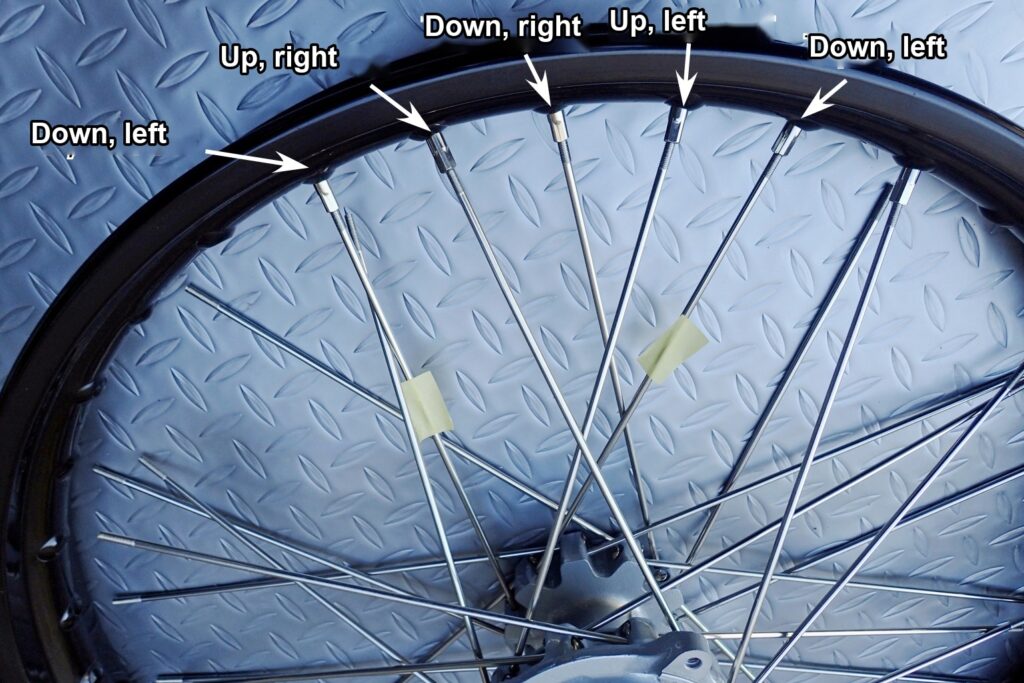
Sorry, the photo may be hard to read because of how I took it.
It's a simple job, but work carefully so you don't get the pattern wrong.
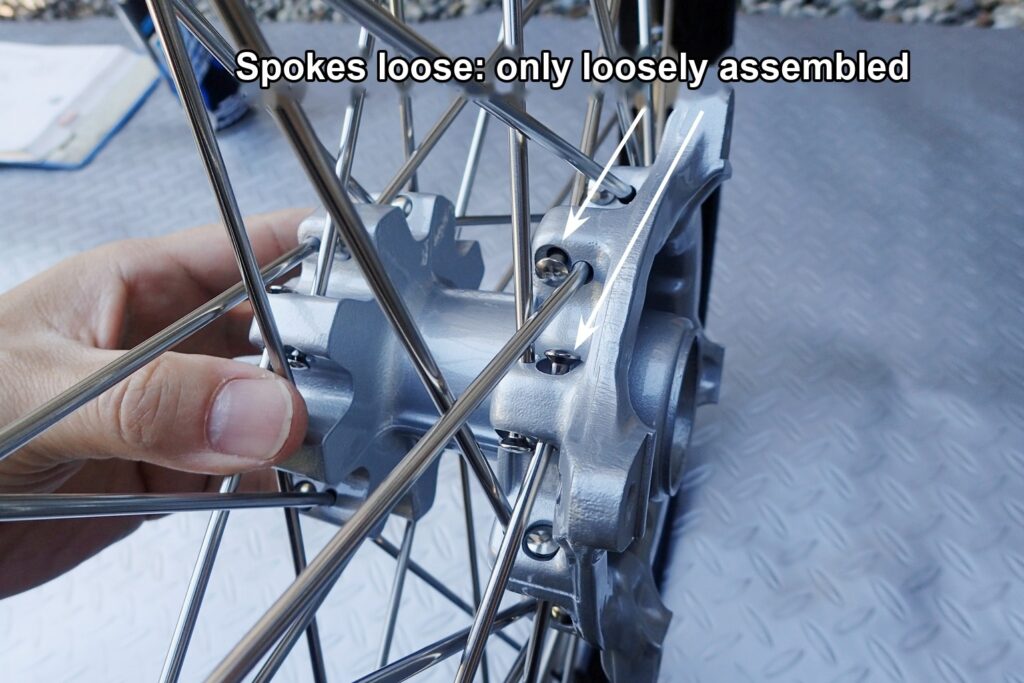
When the loose assembly is finished, it should look like this.

It's only loosely assembled, but it's together!
At this stage the spokes are slack, so the hub rattles from side to side.
Put grease on the spoke threads and tighten the nipples
With the loose assembly done, now tighten the nipples.
DACHI's instructions say to "apply grease to the threads when fitting...", so I took the loosely fitted nipples off again and greased the spoke threads.

The instructions that came with the DACHI stainless spokes
No particular grease was specified, but since it goes near the tyre, I used a highly water-resistant grease I had to hand.
The grease I used was Omega 57.
On the maker's website, Omega 57 is described as an "extreme-pressure, water-resistant bearing grease".
I think I originally bought it for the steering head bearings.

OMEGA 57 extreme-pressure, water-resistant bearing grease
I applied it to the spoke threads,

Grease applied to the spoke threads. Sorry it's out of focus.
Take off the nipple, grease the spoke, screw the nipple back on: repeat 36 times.

As you screw them in, excess grease squeezes out, so don't use too much.
By the way, you need a flat-blade screwdriver to tighten DACHI nipples. (I think the genuine ones had a Phillips head.)

You can see why you need a flat-blade screwdriver to tighten the nipples
For now, I screwed every nipple in until one or two threads of the spoke were left showing.

I did this for every spoke (leaving one or two threads showing).
Now the hub no longer rattles about.
The next step is to fit the laced wheel to the bike and true it (remove the runout). The bearings also need to go into the hub before fitting the wheel to the bike.
I cover these in a separate article (in Japanese).
Summary
- Before taking a wheel apart, take photos so you can rebuild it
- When putting spokes into the hub, start with the inner holes (the side further from the fork leg)
- If the last spoke won't go in because the neighbouring spoke is in the way, change the angle of the neighbouring spoke (I still had to bend it a little)
- Once all the spokes are through the hub, loosely assemble them to the rim first
- When loosely assembling to the rim, pay attention to which way the nipple holes point and how they relate to the hub
- Grease the spoke threads
How was that? Now you can take on dismantling a wheel to clean the spokes, or replacing rusty spokes, without hesitation.