Hello everyone, Boo here.
When it comes to swingarm maintenance, most of us just clean the parts we can reach, don't we?
But when the swingarm and rear linkage move smoothly, the bike rides better, and I think that also means less fatigue on tour and a bike that is easier to ride.
So this time, I replaced the swingarm bearings.
What you need
- New bearings (I used NTN HK2216)
- New oil seals
- A bearing puller
- Tools to work the bearing puller (here, 14 mm and 17 mm open-ended and ring spanners/wrenches)
- (If needed) something to raise the legs of the bearing puller (more on this later; something hard such as nuts, metal plates or pieces of wood)
- Tools to press in the bearings and oil seals (here, M12 threaded rod, nuts and washers)
1. Remove the bearings

I am replacing the bearings where the swingarm pivot shaft goes through.

This is the state of the bearing.
The grease is dirty and brown, but there seems to be no rust.
At this point, you must measure how deep the bearing sits from the end of the swingarm. Otherwise, when you fit the new bearing, you won't know how far to press it in.
I think the depth is usually the thickness of the oil seal, but it may differ from bike to bike.

To help the bearings come out smoothly, I soaked them with RUSPENE (a WAKO'S penetrating oil) beforehand. (I waited about 24 hours after applying it before pulling the bearings.)

Set the bearing puller and start pulling the bearing out.

The bearing gradually came out.
But...
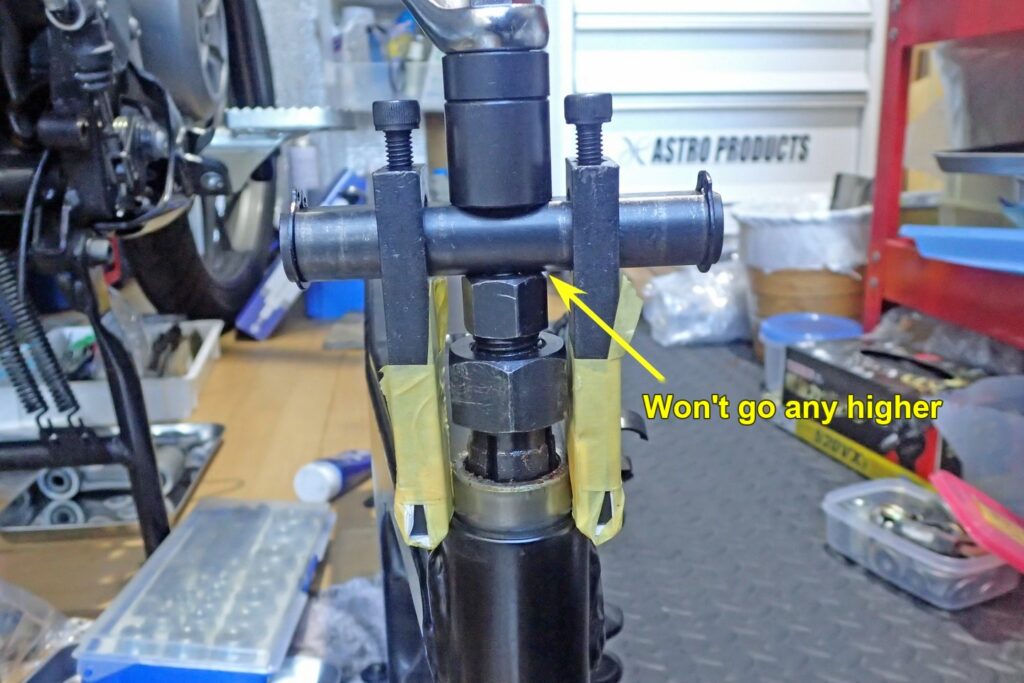
Just when the bearing was nearly out,
the puller reached a point where it could not pull the bearing any further.
This happens now and then.

When this happens, just raise the legs of the bearing puller.
This time I used a nut to raise it. Other things you can use include chopsticks or a piece of wood.
The masking tape on the bearing puller and the nut is there to avoid scratching the swingarm.

All the bearings are out.

Even close up, the grease is dirty, but there seems to be no rust.
In the photo, the original bearing has a cage between the needles (rollers): it is a caged needle roller bearing. For the new ones, I used the same type: NTN HK2216 (caged, drawn cup needle roller bearings).

This is the swingarm after pulling out the bearings.
There was no noticeable corrosion.
2. Press in the new bearings

Next, press in the bearings.
I pressed them in using M12 threaded rod, washers, nuts and so on.

I had measured the depth beforehand (by marking a bamboo skewer), so I pressed the bearing in to that depth. On my G650GS it was 4 mm from the end of the swingarm (the same as the oil seal's thickness).
3. Press in the oil seals
With the bearings in, it is time for the oil seals.
I did not use genuine seals, but compatible seals of the same size.
I used IKO (Nippon Thompson) double-lip seals, DS22284 (22 mm inner diameter, 28 mm outer diameter, 4 mm wide).

Oil seals are not as hard as bearings, so you need to press them in carefully.
I press them in by hand as far as I can, then finish with the same tool I used for the bearings.

They went in nicely.
After that, I applied grease and the job was done.
After the replacement, the rear wheel seemed to move more smoothly. But it may just be the placebo effect.
I pressed this seal in with the main lip facing outwards. The swingarm pivot gets a lot of mud and water when riding, so my main aim was to keep dirt out.
The direction of this DS-type seal depends on what you want it to do. I was unsure which way round to fit it, and I explain what I found in the article below.
During this bearing job I also found that the pivot shaft was rusty. I ordered a new pivot shaft and put the swingarm back for the time being. I describe removing and replacing the shaft in removing the seized pivot shaft and replacing the pivot shaft.
I also removed the rear linkage bearings during this job. I did not replace those; I greased them and reused them (the reason is in this article). The rear linkage work is in the article below (in Japanese).
The main tools I used for this job are RUSPENE penetrating oil (WAKO'S) and a STRAIGHT pilot bearing puller set (8 to 25 mm).