When you remove a motorcycle battery, always disconnect the negative (−) terminal first, then the positive (+) terminal. When you refit it, reverse the order: positive (+) terminal first, then the negative (−) terminal. If you get this order wrong, a tool touching the frame can cause a short circuit the moment it makes contact. That can mean big sparks, damage to the electrics, or burns.
In this post I explain how to remove a battery safely and charge it indoors, and which tools you need. As a real example, I show the removal step by step, with photos, on my BMW G650GS (single-cylinder). It has a lot of fairing screws, so the job takes more steps than on most bikes.
Battery terminal order and safety
The most important thing when removing or refitting a battery is the order in which you handle the terminals.
- Removing: negative (−) terminal → positive (+) terminal
- Refitting: positive (+) terminal → negative (−) terminal
Why disconnect the negative terminal first? (avoiding a short circuit)
On a motorcycle, the metal frame and the engine are electrically connected to the negative side of the battery (the frame is used as the earth, or ground).
If you try to undo the positive terminal first, and the metal tool on it (a screwdriver or spanner/wrench) accidentally touches the frame or another metal part, the tool connects the positive and negative sides directly. That is a short circuit. A large current flows, sparks fly, and wires can burn out or the battery can be damaged.
If you disconnect the negative terminal first, the connection between the frame and the negative side is broken. Then, when you undo the positive terminal, nothing happens even if your tool touches the frame, because there is no voltage difference. So no short circuit can occur.
Tools you need
These are the tools I used for this job. Screw and bolt types vary from bike to bike, so check yours before you start.
- Torx driver (e.g. T25, for the fairing screws on BMW bikes)
- Phillips (cross-head) screwdriver, for the terminal bolts
- Small ratchet or finger ratchet, for tight spaces
- Electric ball-grip screwdriver, to save time on bikes with lots of screws
- Masking tape or electrical (PVC) tape, for insulation
- Motorcycle battery charger
Real example: removing the battery from a BMW G650GS
On the BMW G650GS, the battery is not under the seat. It sits where the fuel tank is on most bikes, inside the dummy tank. You have to remove the centre fairing and the right-hand side panel, so there are a lot of screws and it takes some time.

The G650GS battery sits inside the black cover in the middle of the photo (the centre fairing).
1. Remove the seat
Before you can take off the fairing, you need to remove the seat.

Put the ignition key into the lock on the cover at the back of the rear carrier, unlock it, and take the cover off.

Under the cover there is a red lever. Pulling this lever releases the lock at the back of the seat.

While pulling the red lever, lift the back of the seat.

The seat is off. Now you can reach the screws that hold the centre fairing.
2. Remove the centre fairing

Undo the Torx screws that hold the centre fairing. There are 10 of them, and some are deep in tight spots, so it takes a while with hand tools only.
To speed things up, I used a Vessel electric ball-grip screwdriver here. It makes it easy to reach tight spots and to spin the screws out quickly.
For more about how I use it, see my tool article below (in Japanese).

Removing the screws is not enough to take off the centre fairing. You also need to remove the engine oil filler cap in the middle.

You can remove the oil filler cap with the spark plug spanner from the on-board tool kit, but I take it off often, so I use a special tool I made myself.
I explain how I made the filler cap tool, and how I change the oil, in the article below (in Japanese).

The centre fairing is off.

Now you can see the battery itself. If you have a mains socket near where you park, you can connect a charger at this point and charge the battery on the bike. I have no power outlet outdoors, so this time I took the battery right out of the bike.
3. Remove the right-hand side panel
To lift the battery out safely and easily, also remove the right-hand side panel.
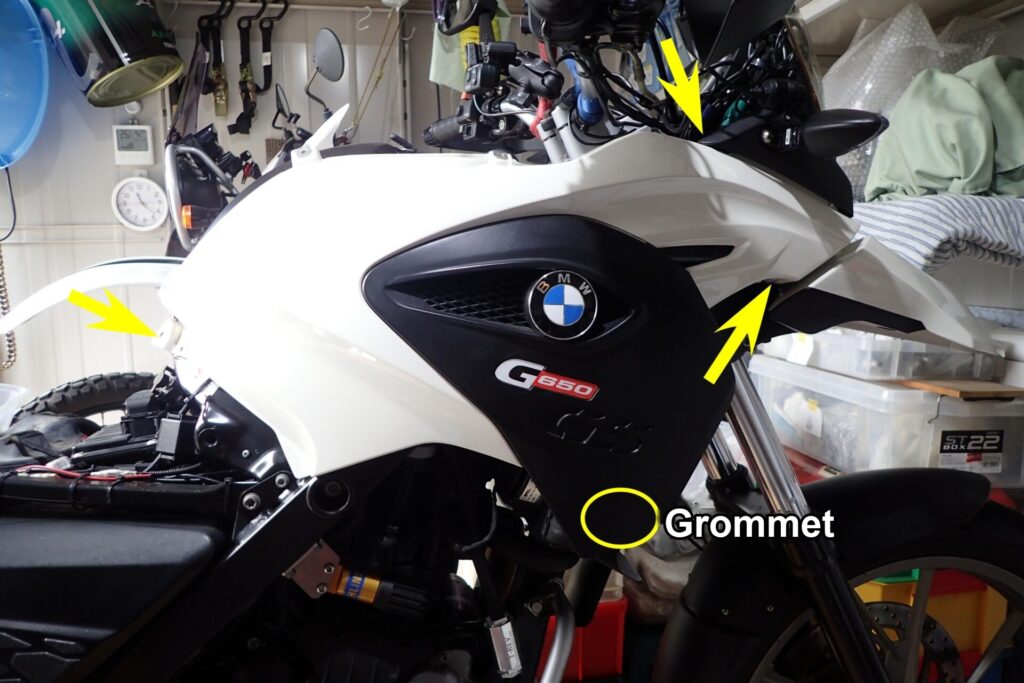
To remove the right-hand side panel, undo the 3 screws marked by the yellow arrows in the photo and release the panel from the grommet at 1 point. Together with the 10 screws on the centre fairing, that makes 13 screws in total.

With the right-hand side panel off, there is enough room to get your hands around the whole battery.
4. Disconnect the terminals and lift out the battery
Now disconnect the terminals. As explained above, always disconnect the negative terminal first.

There is little space around the terminals, so I fitted a Phillips screwdriver bit socket to a straight finger-tip ratchet to loosen the bolt. Even where a long screwdriver will not fit, this lets you apply torque reliably.

Tape the removed negative lead to the bike with masking tape or similar, so that it cannot spring back and touch the battery terminal while you work. This also insulates it.
Next, disconnect the positive terminal. Also, don't forget to pull off the breather (vent) tube connected to the side of the battery (the clear hose I am pointing at).

Remove the rubber retaining strap and lift the battery straight up. The surrounding wires and harness catch easily, so don't pull hard. Check the clearance and take it out carefully.
Checking the battery and charging it indoors

Now check the battery you removed. The battery in my bike is a GS YUASA YB12AL-A2, a conventional (vented, open-type) battery rated 12 V 12 Ah. It was about four years old.
When I checked the electrolyte level in each cell, it had dropped to around the LOWER LEVEL line, so I topped it up to the specified line with battery top-up water (purified or distilled water).
*Do not use tap water. The impurities in it damage the plates. Always use purified water made for batteries.
Charging with a motorcycle charger

Move the battery indoors and connect the charger. The charger I used is a CTEK JS800 (now discontinued).
Motorcycle batteries have a small capacity, so a high-current car charger can damage them. Always use a low-current (about 0.8 A to 1 A) maintenance or trickle charger that is suitable for motorcycles.

Start charging. According to the charger's manual, a full charge takes about 10 hours. A conventional battery gives off flammable hydrogen gas while it charges, so do it in a well-ventilated place and keep it away from any flame or spark.
My battery was about four years old, but after charging it and putting it back in the bike, the engine started normally.
I have used the JS800 for many years. As a replacement, I am considering an OptiMate (such as the OptiMate 4 Quad Program), which has a good track record as a motorcycle charger.
Common causes and signs of a flat battery
If you see any of the following when you go to ride, suspect a flat battery (low voltage).
- When you press the starter button, the starter motor does not turn; you only hear the relay click
- When you turn the ignition key on, the headlight and tail light do not come on (or are very dim)
- The LCD display and warning lights on the instrument panel do not respond
The main cause is self-discharge from not riding for a long time. Watch out especially in winter, when the chemical reaction slows down; in the rainy season, when long spells of rain keep you off the bike; and in midsummer, when the heat speeds up deterioration. The battery discharges more easily at these times.
Summary: follow the terminal order and you can remove a battery safely
When removing or refitting a motorcycle battery, the golden rule for avoiding accidents is to follow the terminal order: negative first when removing, positive first when refitting.
Even on a bike with a lot of screws, like the BMW G650GS, you can do the job safely yourself if you follow the steps. If a battery has been completely flat and sulphation (crystal build-up) has set in, charging may not bring the voltage back. If the starter motor still does not turn briskly after charging, take it that the battery has reached the end of its life and consider replacing it with a new one.
The battery in my G650GS was a GS YUASA YB12AL-A2 (conventional type). If you replace yours, check the type number on the battery fitted to your bike before you choose a new one.